| title | description | position | category |
|---|---|---|---|
应用 |
快速创建应用 |
4 |
概览 |
- 第一步:安装 Node.js(>=10.8.0) 与 NPM 包管理工具;
- 第二步:安装 Serverless Devs 开发者工具;
$ npm install @serverless-devs/s -g
- 第三步:可以通过
s -v判断工具是否安装成功,如果安装成功可以看到相对应的版本信息,例如:@serverless-devs/s: 2.0.89, @serverless-devs/core: 0.1.7, darwin-x64, node-v12.15.0
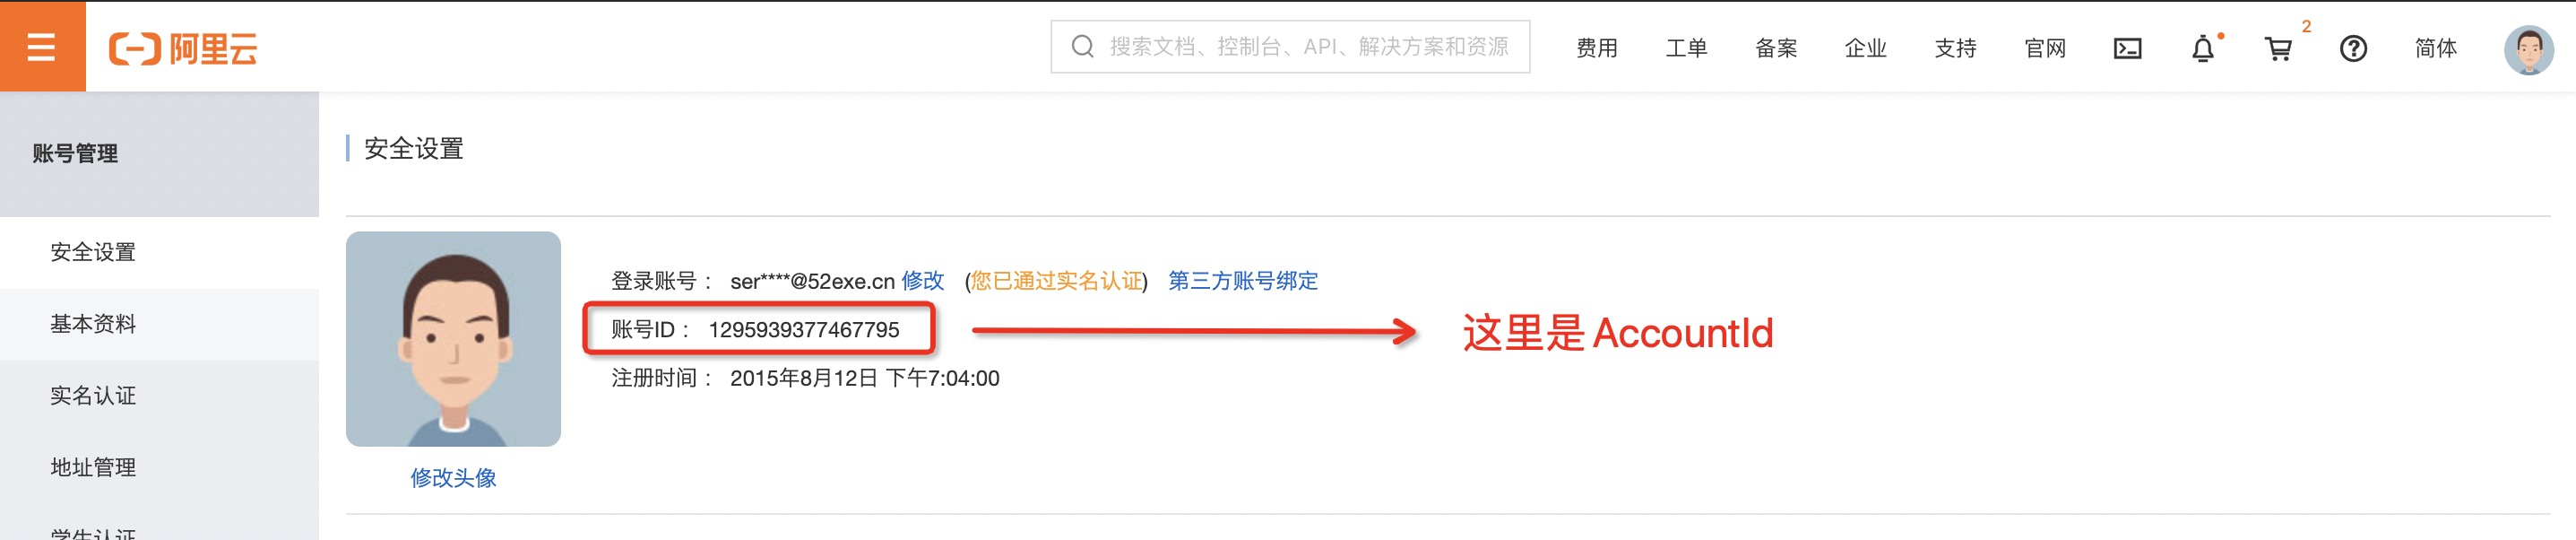
由于本快速上手文档,将会以 阿里云函数计算 为例,所以此处的密钥配置也是以阿里云密钥配置为例:
-
打开 AccountId获取页面 获取AccountId :
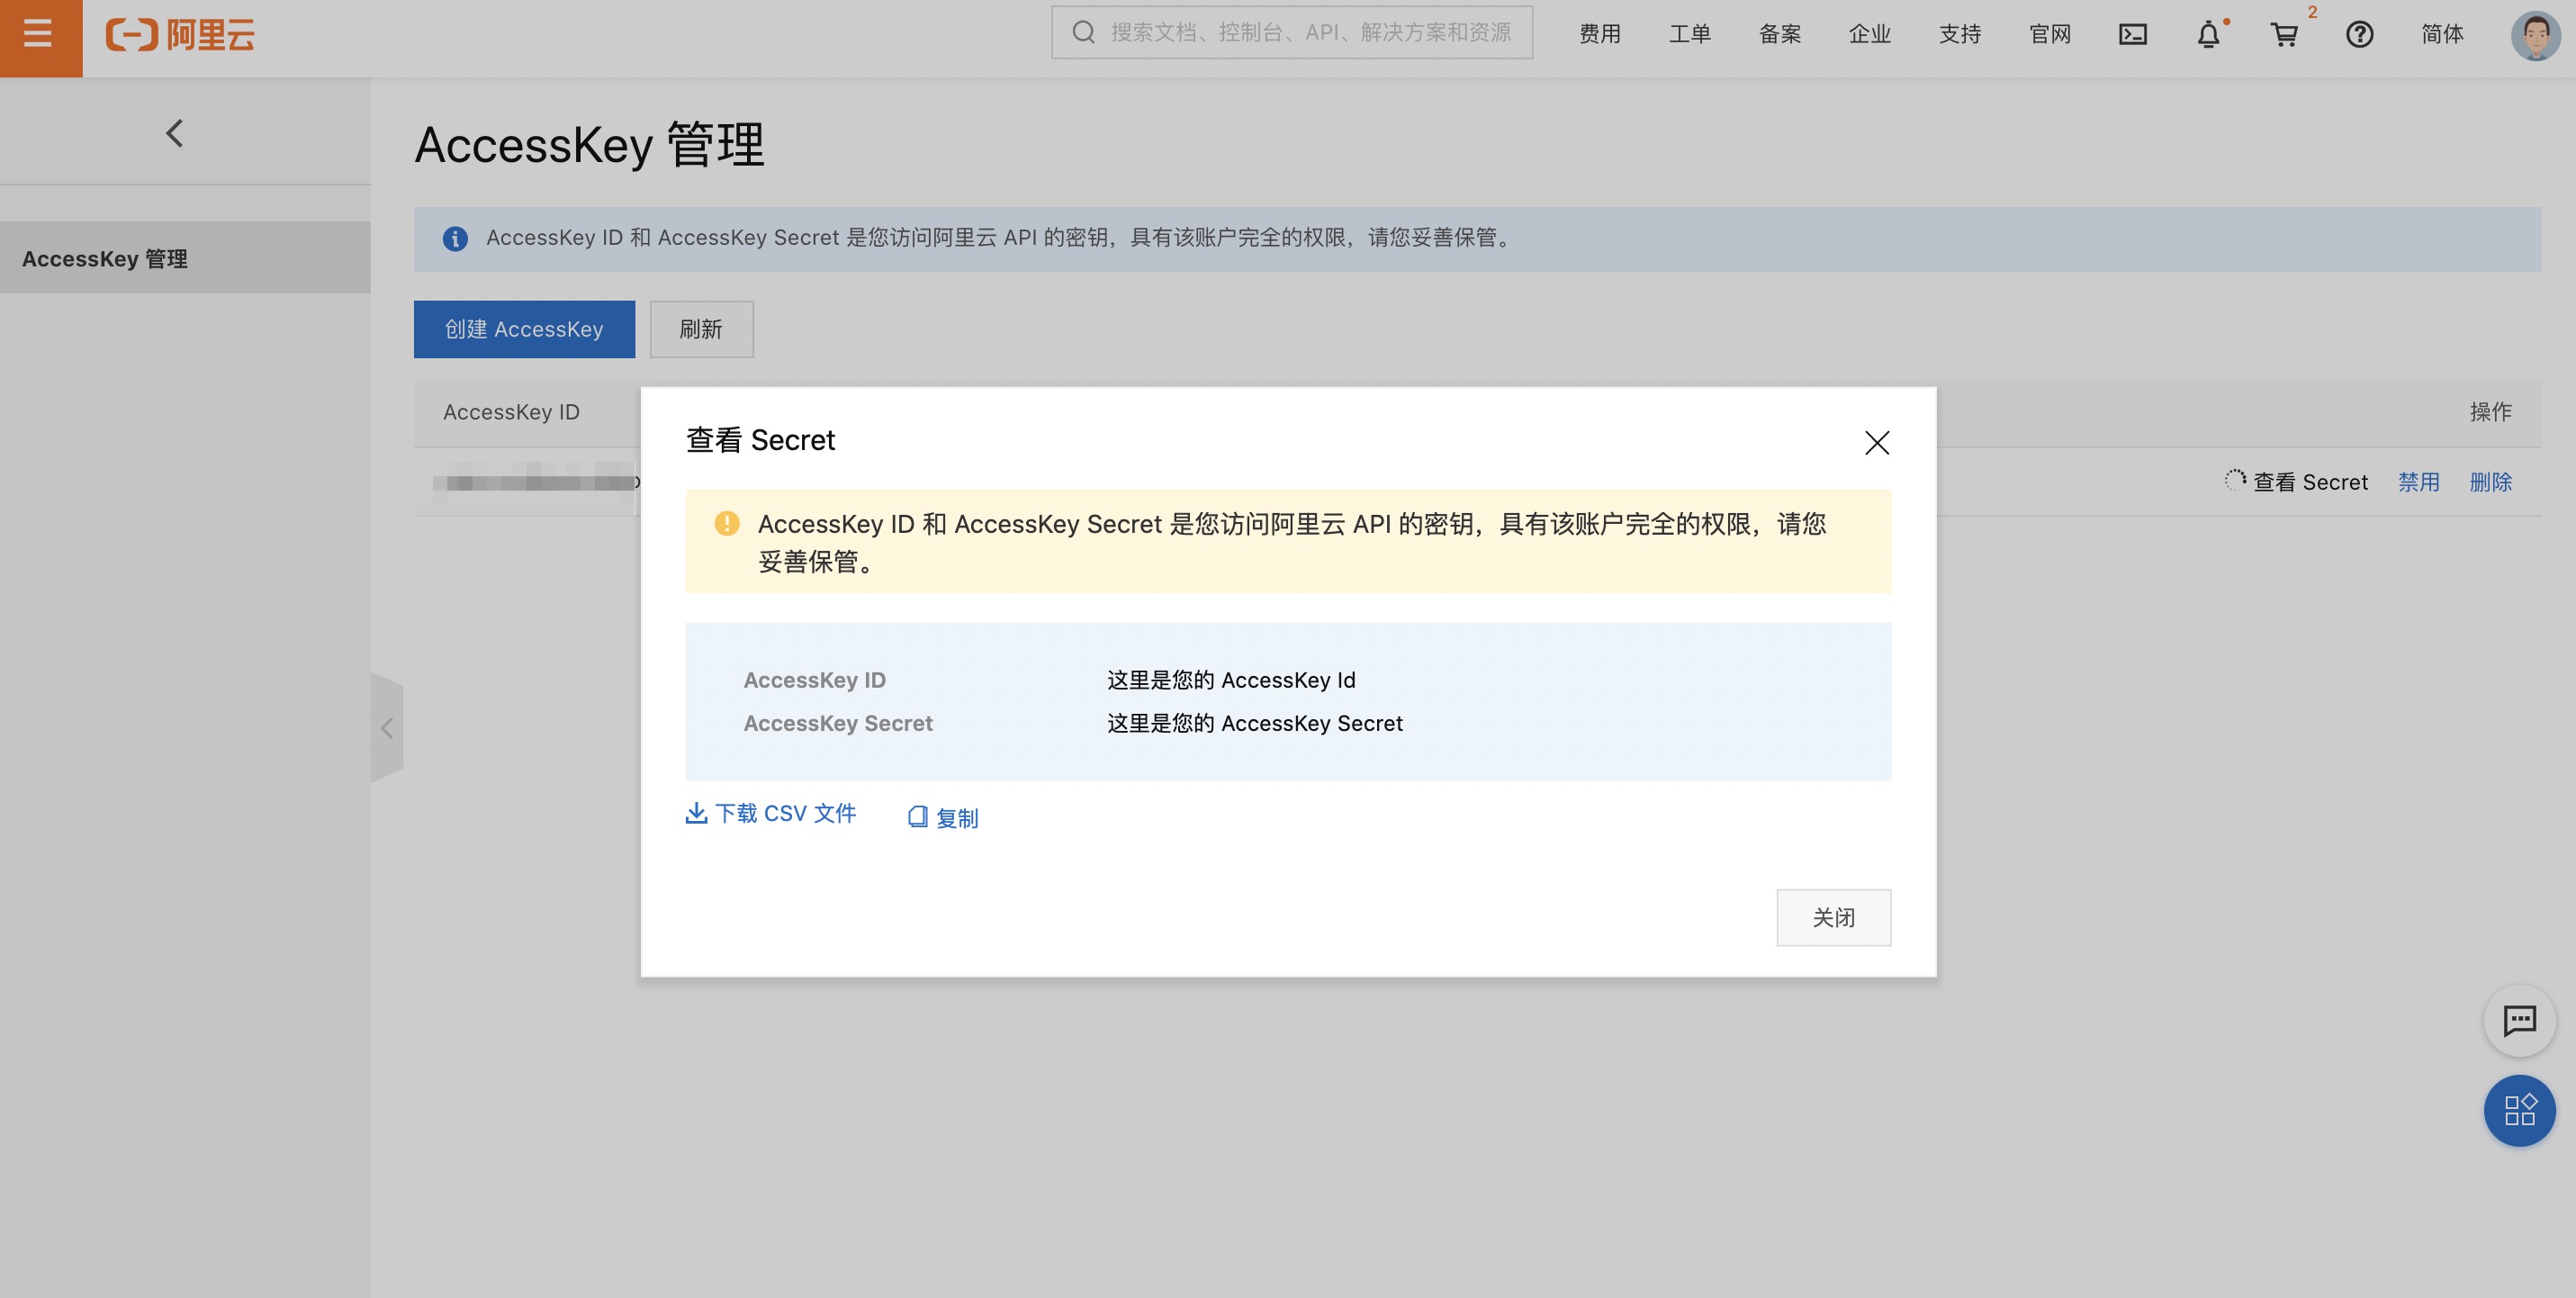
-
打开 获取密钥页面 获取密钥信息 :
-
执行
s config add,并选择Alibaba Cloud (alibaba):$ s config add ? Please select a template: Alibaba Cloud (alibaba) 🧭 Refer to the document for alibaba key: http://config.devsapp.net/account/alibaba ? AccountID ()
-
此时,可以按照引导,进行密钥的配置:
? Please select a template: Alibaba Cloud (alibaba)
🧭 Refer to the document for alibaba key:  http://config.devsapp.net/account/alibaba
? AccountID 此处填写AccountID
? AccessKeyID 此处填写AccessKeyID
? AccessKeySecret 此处填写AccessKeySecret
? Please create alias for key pair. If not, please enter to skip alibaba-access

    Alias: alibaba-access
    AccountID: 此处填写AccountID
    AccessKeyID: 此处填写AccessKeyID
    AccessKeySecret: 此处填写AccessKeySecret

Configuration successful
-
为了验证密钥是否正确配置,可以通过
s config get -a alibaba-access进行指定密钥的查看:$ s config get -a alibaba-access [2021-10-27T17:39:39.881] [INFO ] [S-CLI] - alibaba-access: AccountID: 此处填*******tID AccessKeyID: 此处填*********yID AccessKeySecret: 此处填*************ret
更详细的密钥配置方法,可以参考密钥配置文档
云账号 AccessKey 是您访问阿里云 API 的密钥,具有该账户完全的权限,请您务必妥善保管!不要通过任何方式(e.g. Github)将 AccessKey 公开到外部渠道,以避免被他人利用而造成 安全威胁 。
强烈建议您遵循 阿里云安全最佳实践 ,使用 RAM 子用户 AccessKey 来进行 API 调用。
-
执行
s命令:$ s ? Serverless Devs project is not detected. Do you want to create a new project? (Y/n)
-
填写
y,并按回车,可以进入到创建引导部分:🚀 Serverless Awesome: https://github.com/Serverless-Devs/package-awesome ? Hello Serverless for Cloud Vendors (Use arrow keys or type to search) ❯ Alibaba Cloud Serverless AWS Cloud Serverless Baidu Cloud Serverless Huawei Cloud Serverless Tencent Cloud Serverless Dev Template for Serverless Devs
-
此时只需要选择对应的选项,按照引导进行操作,即可。例如选择
Alibaba Cloud Serverless,就可以看到阿里云Serverless产品下的应用模板分类:? Please select an Serverless-Devs Application (Use arrow keys or type to search) ❯ fc-runtime-starter - 快速部署一个 FC 函数 fc-custom-container-stater - 快速部署一个 custom-container 应用 web-framework-stater - 快速部署一个 Web 框架 static-website-stater - 快速部署一个静态网站 serverless-best-practice - 快速体验 Serverless 最佳实践
-
此时可以继续选择某分类下的具体应用进行初始化,例如选择
fc-runtime-starter之后,可以看到该分类下的具体模板应用:? Please select an templete (Use arrow keys or type to search) ❯ fc-http-nodejs - 快速部署一个 nodejs12 http函数 fc-http-python - 快速部署一个 python3 http函数 fc-http-php - 快速部署一个 php http函数 fc-http-java - 快速部署一个 java8 http函数 fc-event-nodejs - 快速部署一个 nodejs12 event函数 fc-event-python - 快速部署一个 python3 event函数 fc-event-php - 快速部署一个 php event函数
选择
fc-http-nodejs即可完成创建,在引导的过程中,可能会出现填写项目名称以及选择密钥的过程:- 项目名称可以是:
start-fc-http-nodejs12 - 密钥可以选择我们上文中创建过的:
alibaba-access
例如:
🚀 Serverless Awesome: https://github.com/Serverless-Devs/package-awesome ? Hello Serverless for Cloud Vendors Alibaba Cloud Serverless ? Please select an Serverless-Devs Application fc-runtime-starter - 快速部署一个 FC 函数 ? Please select an templete fc-http-nodejs - 快速部署一个 nodejs12 http函数 😋 Create application command: [s init devsapp/start-fc-http-nodejs12] ? Please input your project name (init dir) start-fc-http-nodejs12 ✔ file decompression completed ? please select credential alias alibaba-access ... ... 🏄 Thanks for using Serverless-Devs 👉 You could [cd /Users/jiangyu/start-application/start-fc-http-nodejs12] and enjoy your serverless journey! 🧭️ If you need help for this example, you can use [s -h] after you enter folder. 💞 Document ❤ Star:https://github.com/Serverless-Devs/Serverless-Devs ? 是否立即部署该项目? (Y/n)
- 项目名称可以是:
-
可以看到,系统在最后有一个提醒,是否要部署该项目,此时可以输入
y,直接进行项目的部署,稍等片刻,可以看到部署结果:fc-deploy-test: region: cn-hangzhou service: name: fc-deploy-service function: name: http-trigger-nodejs12 runtime: nodejs12 handler: index.handler memorySize: 128 timeout: 60 url: system_url: https://1583208943291465.cn-hangzhou.fc.aliyuncs.com/2016-08-15/proxy/fc-deploy-service/http-trigger-nodejs12/ custom_domain: - domain: http://http-trigger-nodejs12.fc-deploy-service.1583208943291465.cn-hangzhou.fc.devsapp.net triggers: - type: http name: httpTrigger此时可以打开
domain返回给我们的域名,进行测试。
-
初始化一个已有的人工智能目标检测项目:
s init devsapp/image-prediction-app,初始化过程中可能会出现填写项目名称以及选择密钥的过程:- 项目名称可以是:
image-prediction-app - 密钥可以选择我们上文中创建过的:
alibaba-access
例如:
$ s init devsapp/image-prediction-app 🚀 Serverless Awesome: https://github.com/Serverless-Devs/package-awesome ? Please input your project name (init dir) image-prediction-app ✔ file decompression completed ? please select credential alias alibaba-access ___ __ __ _______ _______ _______ | | | |_| || _ || || | | | | || |_| || ___|| ___| | | | || || | __ | |___ | | | || || || || ___| | | | ||_|| || _ || |_| || |___ |___| |_| |_||__| |__||_______||_______| Welcome to the image-prediction-app application This application requires to open these services: FC : https://fc.console.aliyun.com/ This application can help you quickly deploy the image-prediction-app project. The application uses FC component:https://github.com/devsapp/fc The application homepage: https://github.com/devsapp/image-prediction-app 🏄 Thanks for using Serverless-Devs 👉 You could [cd /Users/jiangyu/start-application/image-prediction-app] and enjoy your serverless journey! 🧭️ If you need help for this example, you can use [s -h] after you enter folder. 💞 Document ❤ Star:https://github.com/Serverless-Devs/Serverless-Devs
- 项目名称可以是:
-
进入项目目录:
cd image-prediction-app -
通过
deploy命令进行项目的部署:Tips for next step ====================== * Display information of the deployed resource: s info * Display metrics: s metrics * Display logs: s logs * Invoke remote function: s invoke * Remove Service: s remove service * Remove Function: s remove function * Remove Trigger: s remove trigger * Remove CustomDomain: s remove domain imageAi: region: cn-hangzhou url: custom_domain: - domain: http://server.ai-cv-image-prediction.1583208943291465.cn-hangzhou.fc.devsapp.net
-
此时可以打开系统分配的测试域名,并上传一张图片进行测试:

-
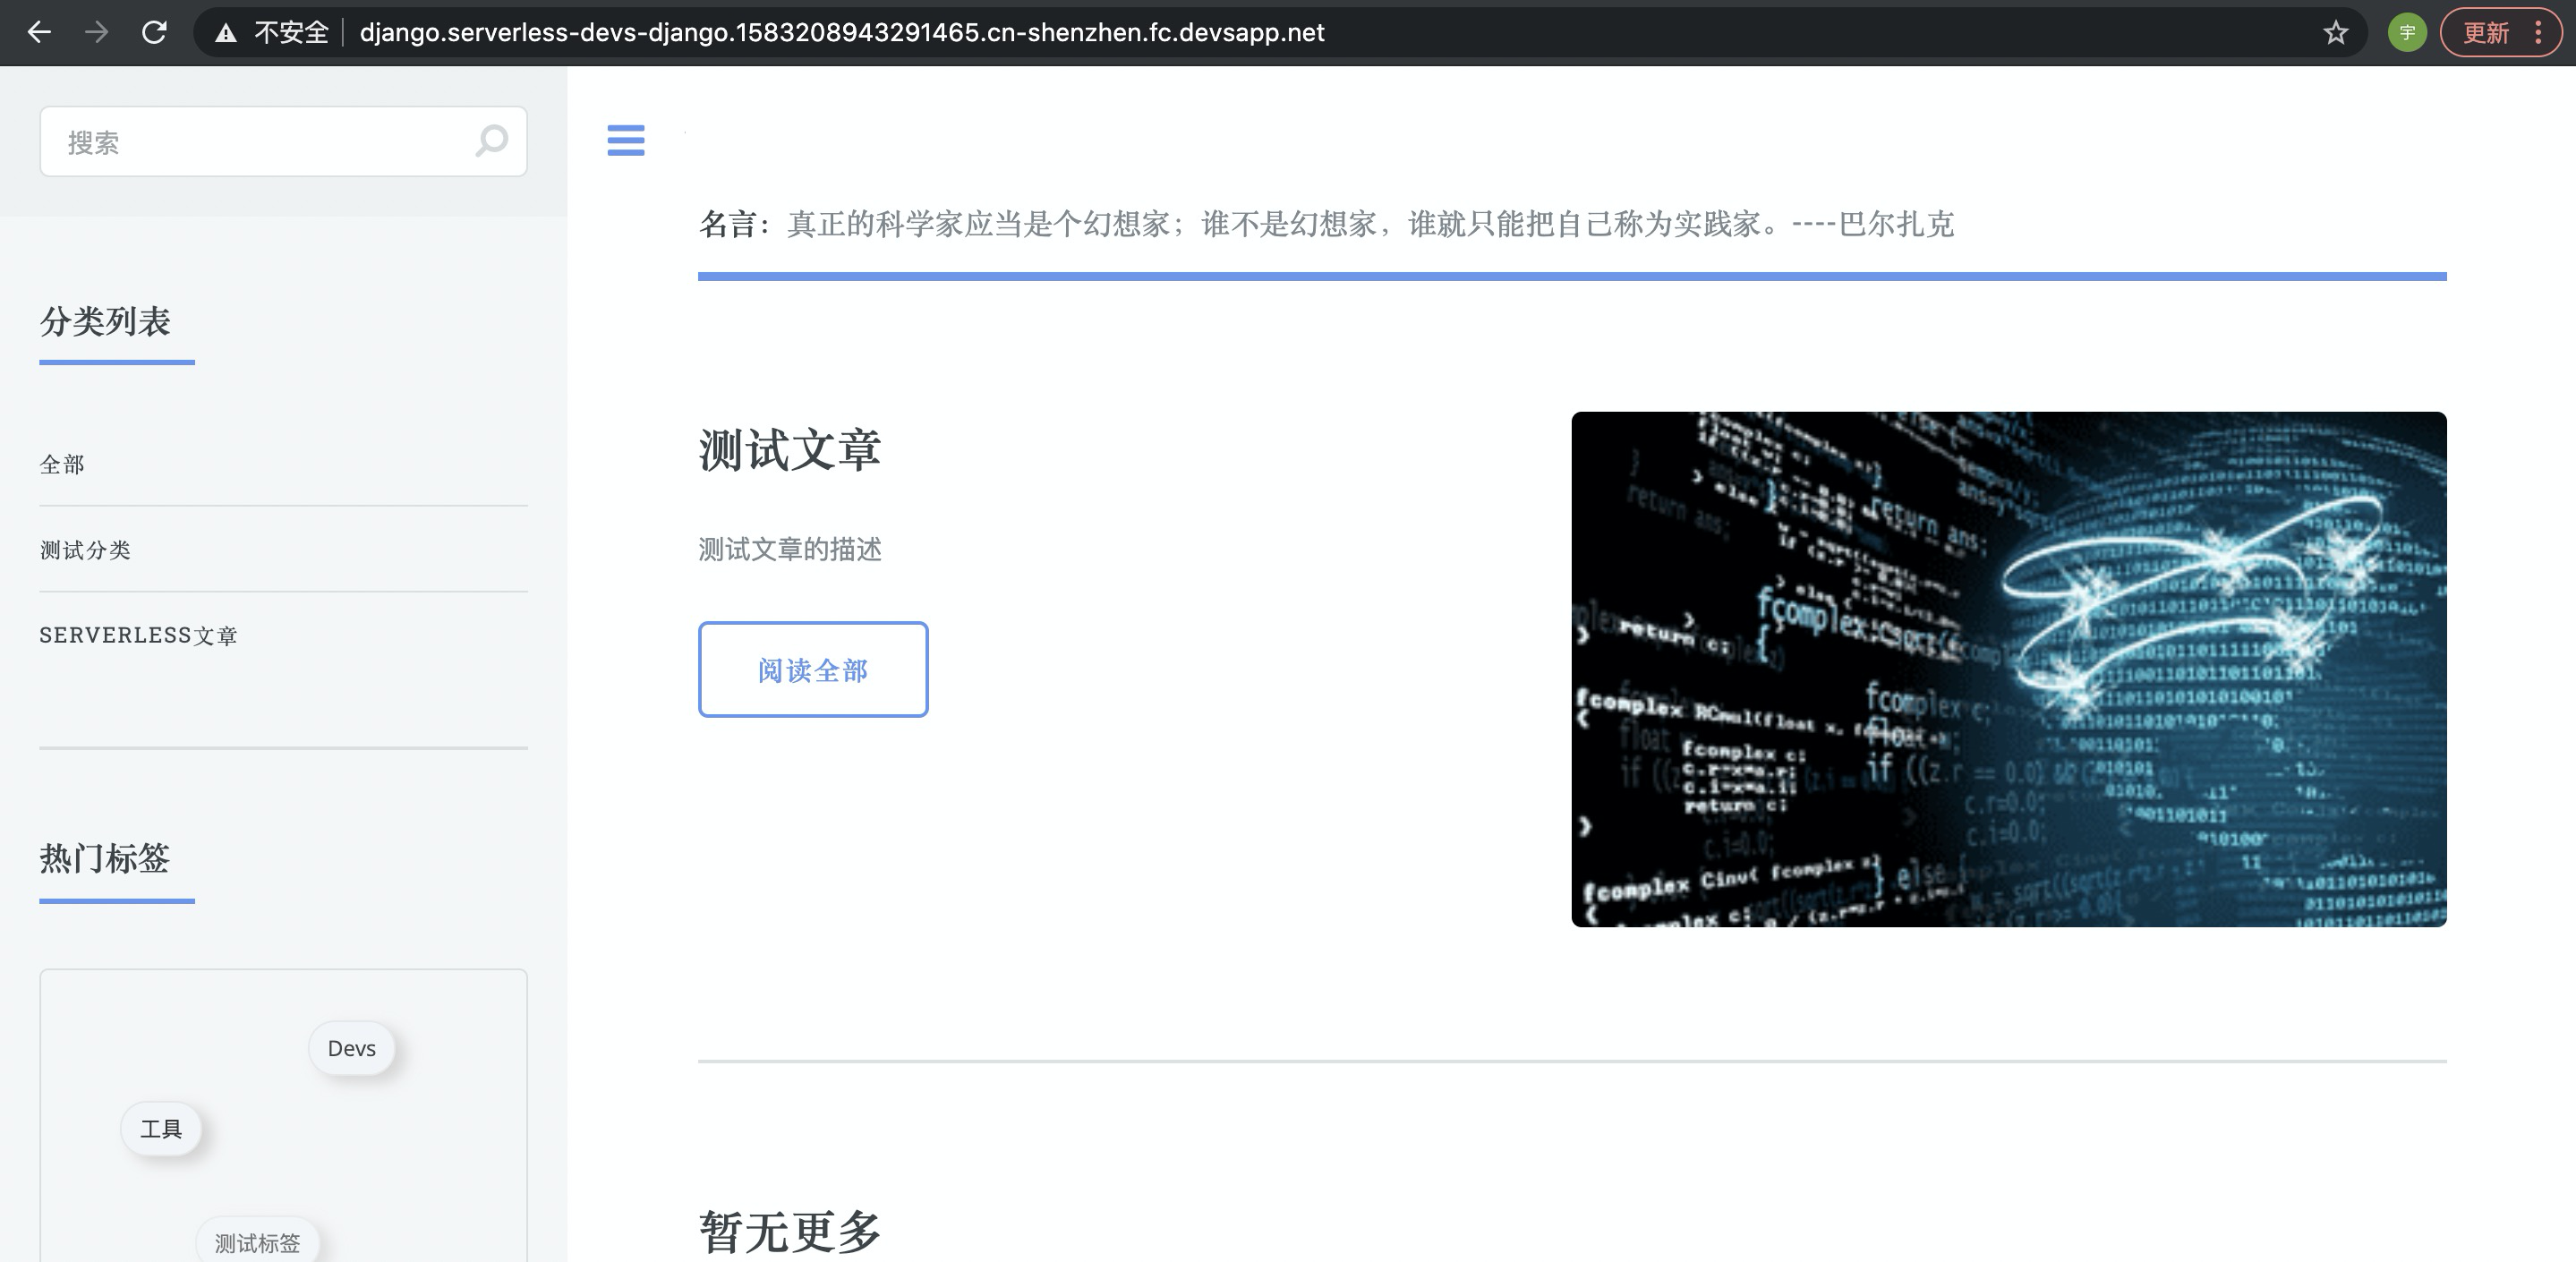
初始化一个已有的基于Django的博客项目:
s init django-blog,初始化过程中可能会出现填写项目名称以及选择密钥的过程:- 项目名称可以是:
django-blog - 密钥可以选择我们上文中创建过的:
alibaba-access
例如:
$ s init django-blog 🚀 Serverless Awesome: https://github.com/Serverless-Devs/package-awesome ? Please input your project name (init dir) django-blog ✔ file decompression completed ? please select credential alias alibaba-access ______ ___ _______ __ _ _______ _______ _______ ___ _______ _______ | | | || _ || | | || || || _ || | | || | | _ | | || |_| || |_| || ___|| _ || |_| || | | _ || ___| | | | | | || || || | __ | | | || || | | | | || | __ | |_| | ___| || || _ || || || |_| || _ | | |___ | |_| || || | | || || _ || | | || |_| || || |_| || || || |_| | |______| |_______||__| |__||_| |__||_______||_______||_______||_______||_______||_______| Welcome to the django-blog application This application requires to open these services: FC : https://fc.console.aliyun.com/ This application can help you quickly deploy the django-blog project. The application uses Django component:https://github.com/devsapp/django The application homepage: https://github.com/devsapp/django-blog * Python 3.7 is recommended; * If the version is greater than Python 3.7: * Operation error: ImportError: cannot import name 'metadata' from 'importlib', you can refer to: https://stackoverflow.com/questions/59216175/importerror-cannot-import-name-metadata-from-importlib * Default information: * Admin:/admin * Default Admin Username: blog * Default Admin Password: myblog12345! 🏄 Thanks for using Serverless-Devs 👉 You could [cd /Users/jiangyu/django-blog] and enjoy your serverless journey! 🧭️ If you need help for this example, you can use [s -h] after you enter folder. 💞 Document ❤ Star:https://github.com/Serverless-Devs/Serverless-Devs
- 项目名称可以是:
-
进入项目目录:
cd django-blog -
通过
deploy命令进行项目的部署:Tips for next step ====================== * Invoke remote function: s invoke ✔ Try container acceleration djangoBlog: region: cn-shenzhen serviceName: serverless-devs-django functionName: django customDomains: - http://django.serverless-devs-django.1583208943291465.cn-shenzhen.fc.devsapp.net
-
此时可以打开系统分配的测试域名,并上传一张图片进行测试: