This repository was created for the webinar Embedded Computer Vision both to show how easy it is to get started with image analytics in an Axis network camera but also to show some interesting aspects of images as byte arrays. The code does only work (with expected outcome) on a few of the Axis cameras (specifically the ones with ARMv7 architecture and NV12 as native format).
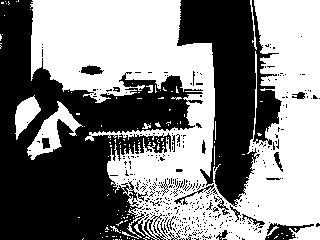
The very simple analytics application that is the final result of the webinar will guess the up- and down direction based on where the colors are more "sky like". The image is splitted in two parts and the ratio of pixels with higer Cb (blue shift) than Cr (red shift) value are counted and compared between the upper and lower part of the image. The binary image seen here is the result of only the thresholding and was created using the show_blue_threshold.c file.
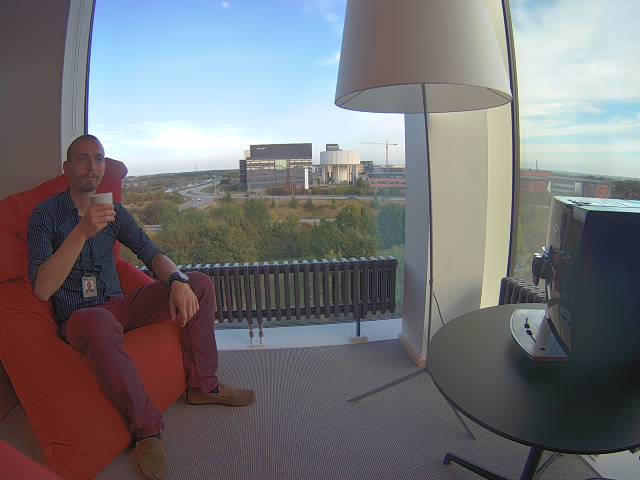
This is the result of the original image:
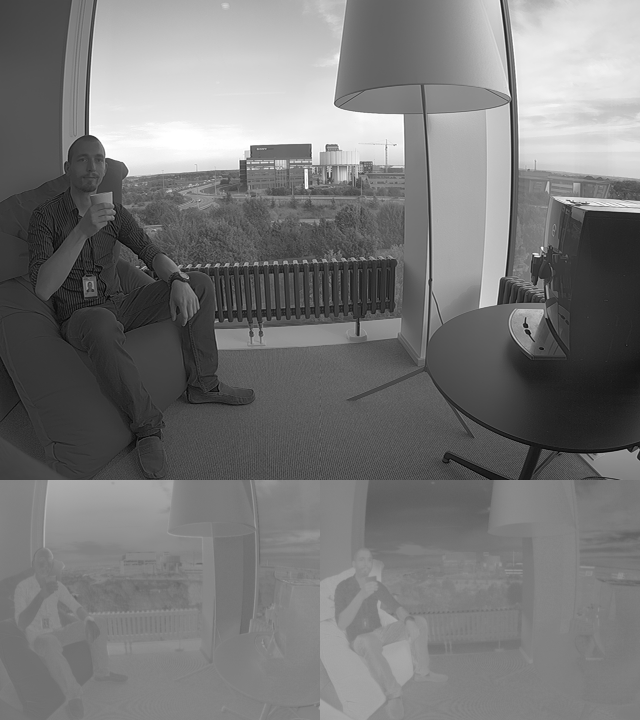
The image in it's native format in e.g. an AXIS M3106-L Mk II camera is stored in NV12 format as YCbCR. These channels can be seen in the following image (created with save_image.c) where the large upper image is the luminance (Y-channel), the lower left is the blue shift (Cb-channel) and the lower right is the red shift (Cr-channel). It can be seen that the bean bag chair, which is red, has a lighter color in the Cr image than the Cb image. The blue details, such as the sky and my shirt are lighter in the Cb image and darker in the Cr image.
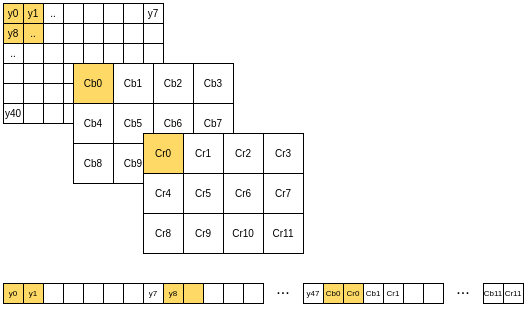
The NV12 format first contains the whole Y-plane, next it contains the Cb and Cr pixels subsampled by a 2 by 2 factor in alternating order. The subsampling means that there is one Cb and one Cr pixel for each group of 4 luminance pixels. The alternating order means that every second address is a Cb pixel and every second is a Cr pixel. This can be seen in the following image where the upper boxes are the logical plane separated representation and the bar in the bottom is the placement in memory.
All code in this repository is for show-case only. It is not designed to be robust and it does not necessarily use the APIs that are best practice to use or the ones that is recommended by Axis. For video data there is multiple APIs and many of them allows to specify or read the format of the image data, the native interface here assumes that you know what you are doing and was selected simply because it was suitable to show how images might be represented in the memory.
The most simple (but not most correct!) way to compile an application for an AXIS M3106-L Mk II network camera is to install the upstream armv7 compiler. You can either install it locally:
apt install gcc-arm-linux-gnueabihf -yand then compile the program:
arm-linux-gnueabihf-gcc hello_world.c -o my-progor you can install and run it in a container to avoid conflicts with other software installed in your computer:
docker run --rm -v `pwd`:/src ubuntu:xenial-20200903 bash -c "apt update && apt install gcc-arm-linux-gnueabihf -y && arm-linux-gnueabihf-gcc /src/hello_world.c -o /src/my-prog"using this way you will reinstall the compiler every time you build, but don't worry - we will get to better methods soon.
In the current working directory should now be a binary file called my-prog. This file is compiled for the armv7 architecture and will probably not run on your host computer (unless your host computer has an ARM CPU or if you e.g. has enabled transparent emulation using QEMU). You can try:
./my-prog # This will fail with an errorWe can however use ssh/scp to copy the binary to the camera and try it there:
scp my-prog 192.168.0.90:/tmp
ssh 192.168.0.90 /tmp/my-prog
# output: Hello World!
If the above does not work, verify the camera IP and that ssh is enabled in the cameras plain config.
The SDK is distributed in two diffenrent docker images, one for the tools, e.g. compilers and one for the libraries. To compile the next applications we need both the libraries and the compiler (altough it would probably work with the upstream compiler as well..). The first way of doing this is to use the docker image with the libraries to copy them to our local source folder. This could look like:
docker run --rm -v `pwd`:/src axisecp/acap-api:3.1-armv7hf cp -r /opt/axis/sdk/temp/sysroots/cortexa9hf-neon-poky-linux-gnueabi/ /src/sysroot
docker run --rm -v `pwd`:/src axisecp/acap-toolchain:3.1-armv7hf /usr/bin/arm-linux-gnueabihf-gcc --sysroot /src/sysroot /src/up_down_detect.c -lcapture -o /src/up_down

scp up_down 192.168.0.90:/tmp
ssh -t 192.168.0.90 /tmp/up_down
A more reproducable way is to create a new container image which combines the tools and the libraries. We can build a new image (named camera-sdk) using the specification in the file Dockerfile:
docker build -t camera-sdk .

docker run --rm -v `pwd`:/src camera-sdk /usr/bin/arm-linux-gnueabihf-gcc --sysroot /sysroot /src/up_down_detect.c -lcapture -o /src/up_down
If you are not comfortable using Docker, or can't use it in your developer machine, the SDK is also available as .deb packages. Take a look at the Axis website for ACAP.