Mac setup
This page covers the setup of your Mac development computer.
The approach followed is to have the app running from the CLI first, since it's usually easier to deploy, and then go on to the option of using Visual Studio.
CONTENT
- Install Docker Desktop
- Configure Docker
- Configure local networking
- Build and deploy eShopOnContainers
- Explore the application
- Optional - Use Visual Studio for Mac
- Explore the code
- Configuring the app for external access from remote client apps
You can install Docker Desktop following :
Install Docker Desktop Of Mac

NOTE You can ensure your system meets the System-requirements
The initial Docker for Desktop configuration is not suitable to run eShopOnContainers because the app uses a total of 25 Linux containers.
Even though the microservices are rather light, the application also runs SQL Server, Redis, MongoDb, RabbitMQ and Seq as separate containers. The SQL Server container has four databases (for different microservices) and takes an important amount of memory.
So it's important to configure enough memory RAM and CPU to Docker.
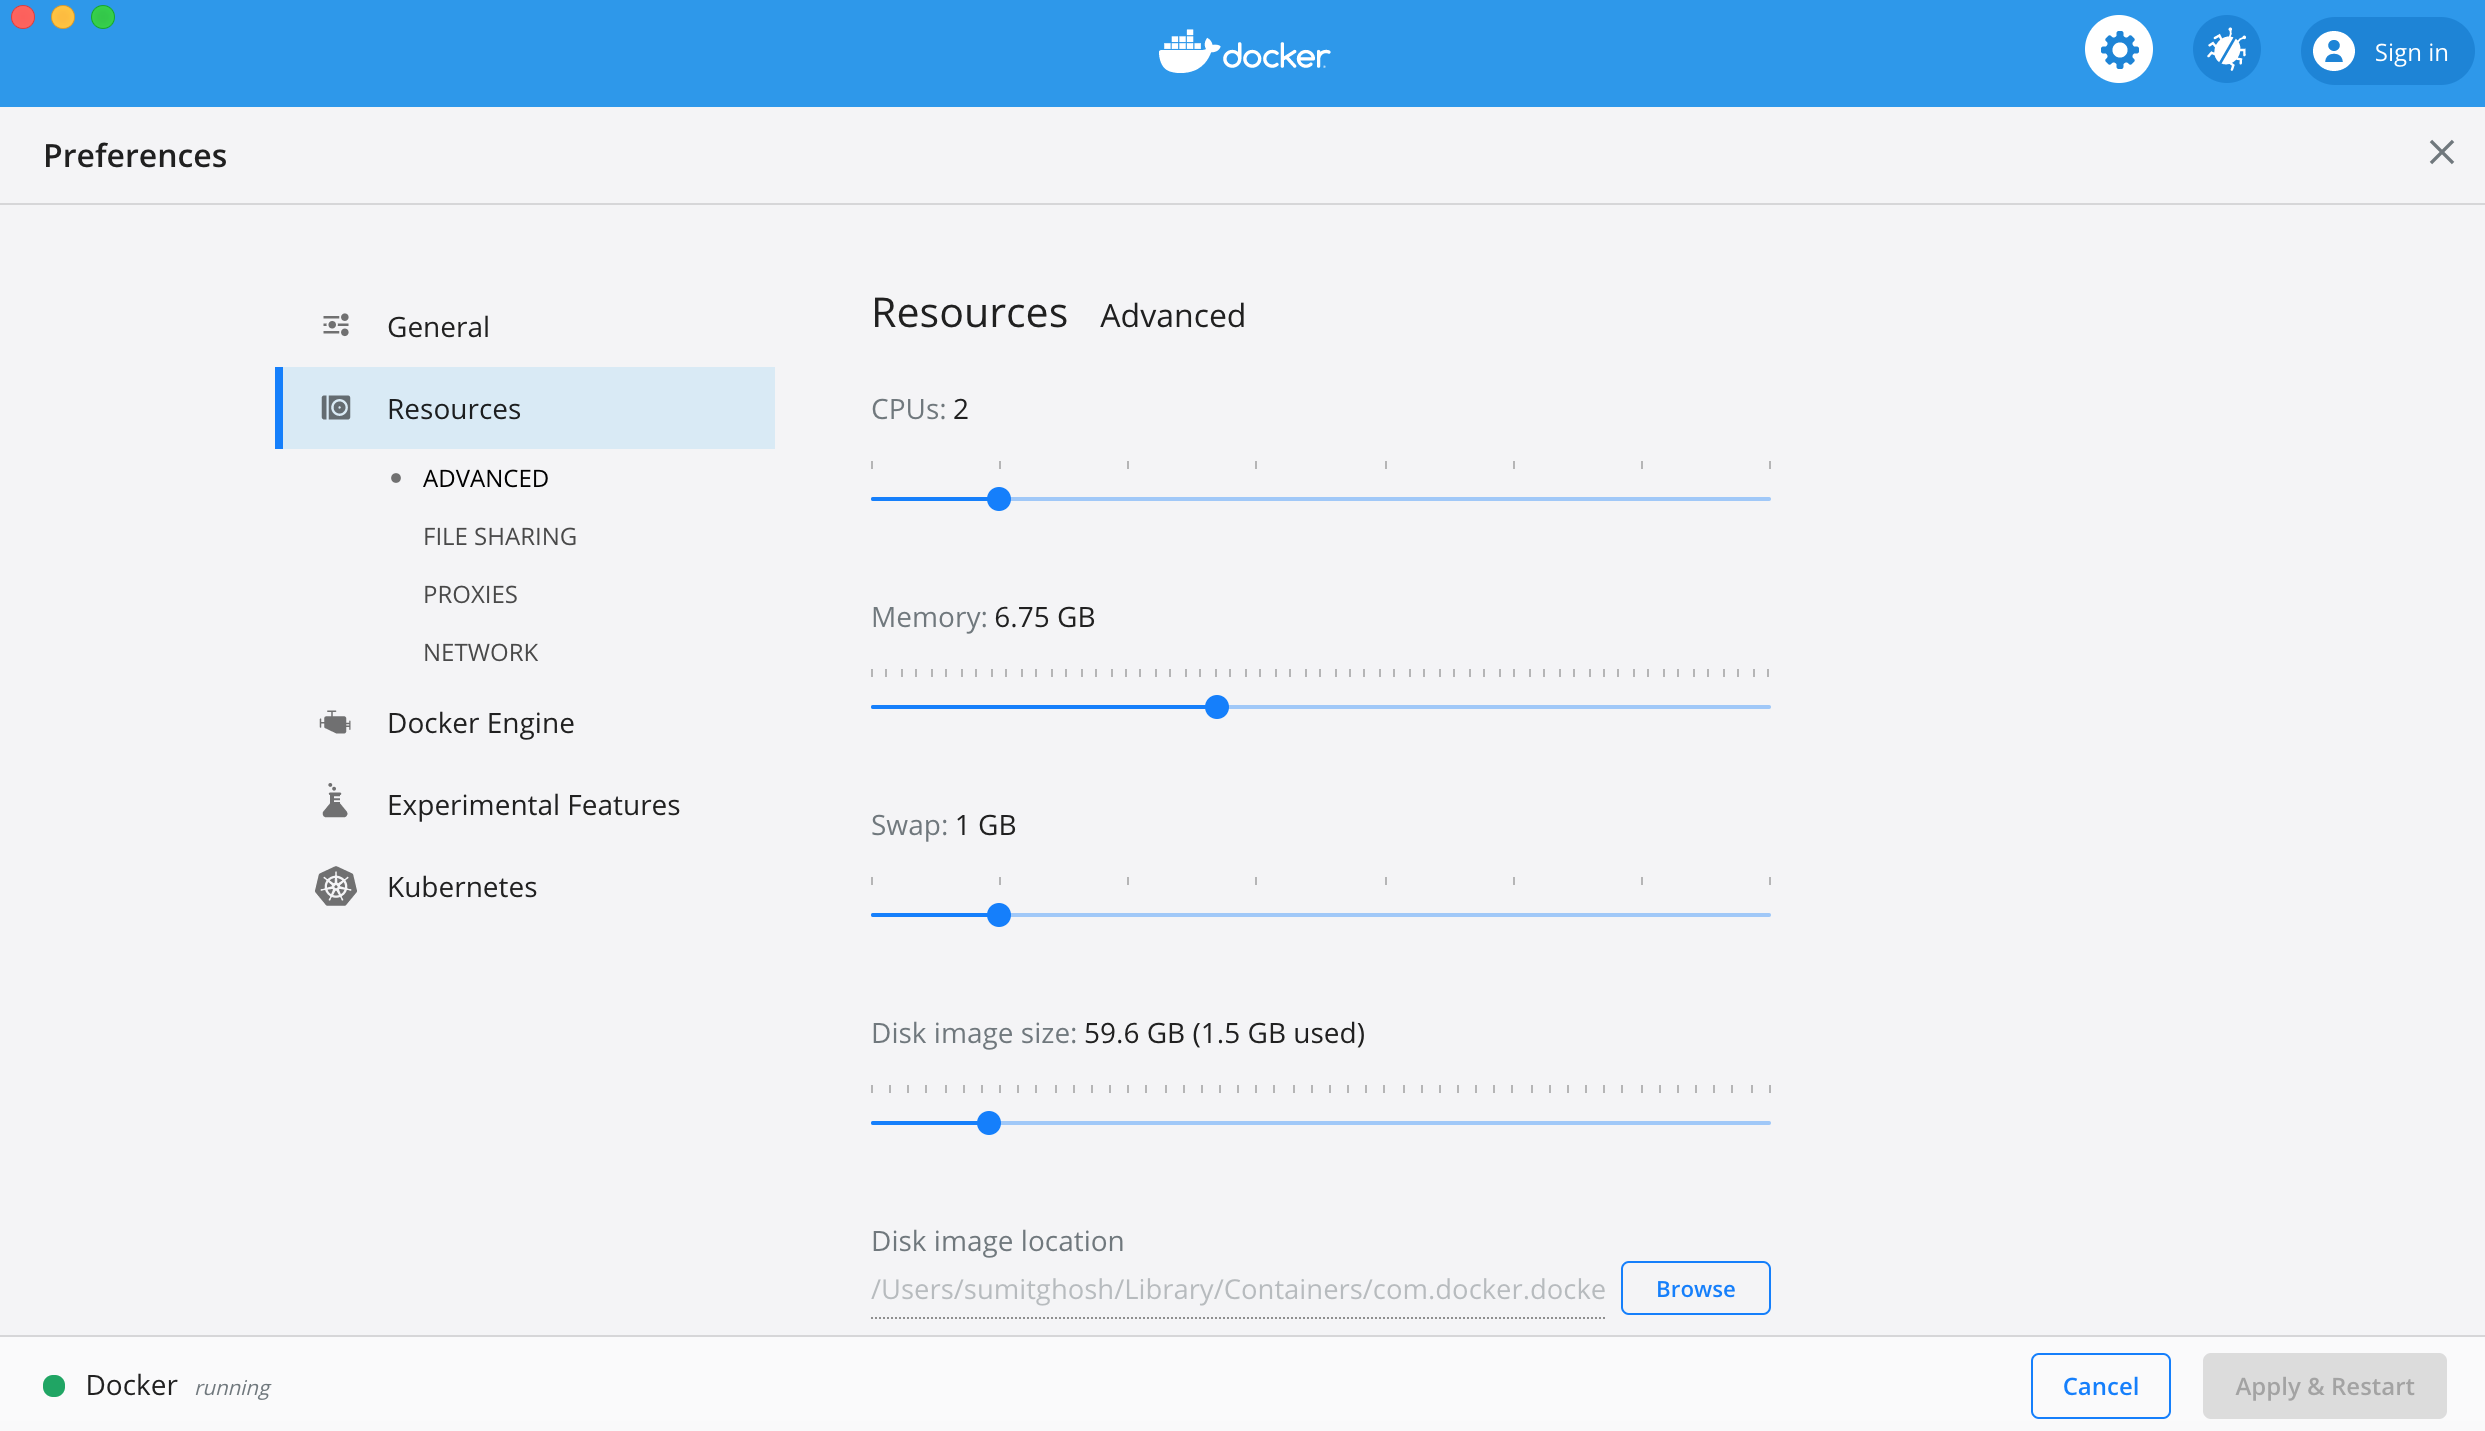
Once Docker for Mac is installed, configure the minimum amount of memory and CPU like so:
- Memory: 6GB
- CPU: 2
This amount of memory is the absolute minimum to have the app running, and that's why you need a 16GB RAM machine for optimal configuration.
Depending on how many apps you are running in your Mac you might need to assign more memory to Docker in the Mac. Usually, 6GB should suffice, but we've got feedback from developers who've needed to assign up to 8GB of RAM to Docker in the Mac.
If your projects are placed within the /Users folder, you don't need to configure anything additional, as that is a pre-shared folder. However, if you place your projects under a different path, like /MyRootProjects, then you'd need to add that shared folder to Docker's configuration.
If using Visual Studio for Mac, it is also important that you share the folder /usr/local/share/dotnet, like here:

This configuration is necessary so you don't get the following error when trying to login in the MVC web app.

That is because the by default IP used to redirect to the Identity service/app used by the application (based on IdentityServer4) is the IP 10.0.75.1.
That IP is always set up when installing Docker for Windows in a Windows 10 machine. It is also used by Windows Server 2016 when using Windows Containers.
eShopOnContainers uses that IP as the "by default choice" so anyone testing the app don't need to configure further settings. However, that IP is not used by "Docker for Mac", so you need to change the config.
If you were to access the Docker containers from remote machines or mobile phones, like when using the Xamarin app or the web apps in remote PCs, then you would also need to change that IP and use a real IP from the network adapter.
As explained in the networking page of Docker Desktop for Mac,
the Mac has a changing IP address (or none if you have no network access). So the recommendation now is to connect to the special Mac-only DNS name docker.for.mac.localhost which will resolve to the internal IP address used by the host.
In the docker-compose.override.yml file, replace the IdentityUrl environment variable (or any place where the IP 10.0.75.1 is used) with:
IdentityUrl=http://docker.for.mac.localhost:5105You could also set your real IP at the Mac's network adapter. But that would be a worse solution as it'll depend on the network you are connecting your Mac development machine..
Therefore, the WebMVC service definition at the docker-compose.override.yml should finally be configured as shown bellow:
webmvc:
  environment:
    - ASPNETCORE_ENVIRONMENT=Development
    - ASPNETCORE_URLS=http://0.0.0.0:80
    - CatalogUrl=http://catalog.api
    - OrderingUrl=http://ordering.api
    - BasketUrl=http://basket.api
    - LocationsUrl=http://locations.api
    - IdentityUrl=http://docker.for.mac.localhost:5105
    - MarketingUrl=http://marketing.api
    - CatalogUrlHC=http://catalog.api/hc
    - OrderingUrlHC=http://ordering.api/hc
    - IdentityUrlHC=http://identity.api/hc
    - BasketUrlHC=http://basket.api/hc
    - MarketingUrlHC=http://marketing.api/hc
    - PaymentUrlHC=http://payment.api/hc
    - UseCustomizationData=True
    - ApplicationInsights__InstrumentationKey=${INSTRUMENTATION_KEY}
    - OrchestratorType=${ORCHESTRATOR_TYPE}
    - UseLoadTest=${USE_LOADTEST:-False}
  ports:
    - "5100:80"
You also have to update the .env file as follows:
ESHOP_EXTERNAL_DNS_NAME_OR_IP=docker.for.mac.localhostIMPORTANT
If you've already encountered the error shown above, when trying to sign in, then you have to delete the
sqldatamicroservice, because the IdentityServer database would've already been seeded, allowing only connections fromlocalhost.
When starting up for the first time, the IdentityServer database is seeded with the allowed clients, taking the information from the environment variables below, in docker-compose.override.yml.
identity-api:
  environment:
    - ASPNETCORE_ENVIRONMENT=Development
    - ASPNETCORE_URLS=http://0.0.0.0:80
    - SpaClient=http://${ESHOP_EXTERNAL_DNS_NAME_OR_IP}:5104
    - XamarinCallback=http://${ESHOP_PROD_EXTERNAL_DNS_NAME_OR_IP}:5105/xamarincallback
    - ConnectionString=${ESHOP_AZURE_IDENTITY_DB:-Server=sqldata;Database=Microsoft.eShopOnContainers.Service.IdentityDb;User Id=sa;Password=Pass@word}
    - MvcClient=http://${ESHOP_EXTERNAL_DNS_NAME_OR_IP}:5100
    - LocationApiClient=http://${ESHOP_EXTERNAL_DNS_NAME_OR_IP}:5109
    - MarketingApiClient=http://${ESHOP_EXTERNAL_DNS_NAME_OR_IP}:5110
    - BasketApiClient=http://${ESHOP_EXTERNAL_DNS_NAME_OR_IP}:5103
    - OrderingApiClient=http://${ESHOP_EXTERNAL_DNS_NAME_OR_IP}:5102
    - MobileShoppingAggClient=http://${ESHOP_EXTERNAL_DNS_NAME_OR_IP}:5120
    - WebShoppingAggClient=http://${ESHOP_EXTERNAL_DNS_NAME_OR_IP}:5121
    - WebhooksApiClient=http://${ESHOP_EXTERNAL_DNS_NAME_OR_IP}:5113
    - WebhooksWebClient=http://${ESHOP_EXTERNAL_DNS_NAME_OR_IP}:5114
    - UseCustomizationData=True
    - ApplicationInsights__InstrumentationKey=${INSTRUMENTATION_KEY}
    - OrchestratorType=${ORCHESTRATOR_TYPE}
  ports:
    - "5105:80"
If you re-deploy with docker-compose up, now the login page should work properly, as in the screenshot below.
NOTE: For some reason, if using SAFARI browser, it can't reach docker.for.mac.localhost but using Chrome in Mac, it works with no issues. Since the usage of docker.for.mac.localhost is just for development purposes, just use Chrome for tests.

There's some additional configuration that's necessary in case you want to connect to the app from the Xamarin app or from the WiFi network, out the computer where the app is installed. You can find the detailed explanation at the end of his page.
At this point you should be able to run eShopOnContainers from the command line. To do that, you should:
cd
md MyGitRepos
cd MyGitRepos
This will create folder /Users/<username>/MyGitRepos will be fine.
2. Clone eShopOnContainer's GitHub repo
git clone https://github.com/dotnet-architecture/eShopOnContainers.gitNote: Remember that the active development is done in dev branch. To test the latest code, use this branch instead of master.
cd eShopOnContainers\src
docker-compose build
While building the docker images should take between 15 and 30 minutes to complete, depending on the system speed.

The first time you run this command it'll take some more additional time as it needs to pull/download the dotnet/core/aspnet and SDK images, so it'll take its time.
When the docker-compose build command finishes, you can check out with Docker CLI the images created with the following Docker command:
docker images
Those are the Docker images available in your local image repository.
You might have additional images, but you should see, at least, the the custom images starting with the prefix eshop/ which is the name of the eShopOnContainers images repo.
The images starting with <none> haven't been tagged with a name and are intermediate images of the build process. Other named images that don't start with eshop/ are official base-images like the mcr.microsoft.com/dotnet or the SQL Server for Linux images.
docker-compose upWith the above single command you deploy the whole solution into your local Docker host. You should view something like this in the first seconds:

Ignore the warnings about environment variables for Azure, as that's only needed when deploying to Azure (Azure SQL Database, Redis as a service, Azure Service Bus, etc.) which is the "next step" when using eShopOnContainers.
Note that the first time you deploy the application (with docker run or docker-compose) it detects that it needs a few related infrastructure images, like the SQL Server, Redis, RabbitMQ images, and the like. So it'll pull or download those base images from the public Docker registry named DOCKER HUB, by pulling the "microsoft/mssql-server-linux" which is the base image for the SQL Server for Linux on containers, and the "library/redis" which is the base Redis image, and so on. Therefore, the first time you run "docker-compose up" it might take a few minutes pulling those images before it spins up your custom containers.
After a few more seconds, when all containers are deployed, you should see something like this:

The next time you run "docker-compose up", the app will start much faster, because all base images will already be downloaded and ready to go.
To stop all container you should just press Ctrl-C on the above terminal.
Open a new terminal to view the running containers with the following command:
docker ps
You can now explore the application or continue with the optional Visual Studio for Mac setup.
If you want to explore the code and debug the application to see it working, you have to install Visual Studio for Mac.
When installing Visual Studio for Mac, you can select between multiple workloads or platforms.
Make sure you select the .NET 6 platform:

Before completing the VS for Mac installation, it will demand you to install XCode, that is needed for multiple dependencies.
If you install Android as a target platform, Java will also be installed as a dependency for building mobile apps for Android.
For running just the Docker containers and web apps, you'd just need the .NET 6 platform.
But if you want to try the eShopOnContainers mobile app, that requires Xamarin and therefore, the iOS and Android platforms, too. Those mobile platforms are optional for this Wiki walkthrough, though.
Make sure you have the latest .NET 6 SDK from https://dotnet.microsoft.com/download/dotnet/6.0 installed.
Run Visual Studio for Mac and open the solution eShopOnContainers-ServicesAndWebApps.sln.
If you just want to run the containers/microservices and web apps, do NOT open the other solutions, like eShopOnContainers.sln as those solutions will also open the Xamarin projects and that might slow you down when testing due to additional dependencies in VS.
After opening the eShopOnContainers-ServicesAndWebApps.sln solution for the first time, it is recommended to wait for a few minutes as VS will be restoring many NuGet packages and the solution won't be able to compile or run until it gets all the nuGet packages dependencies, in the first place (this time is only needed the first time you open the solution. Next times it's a lot faster).
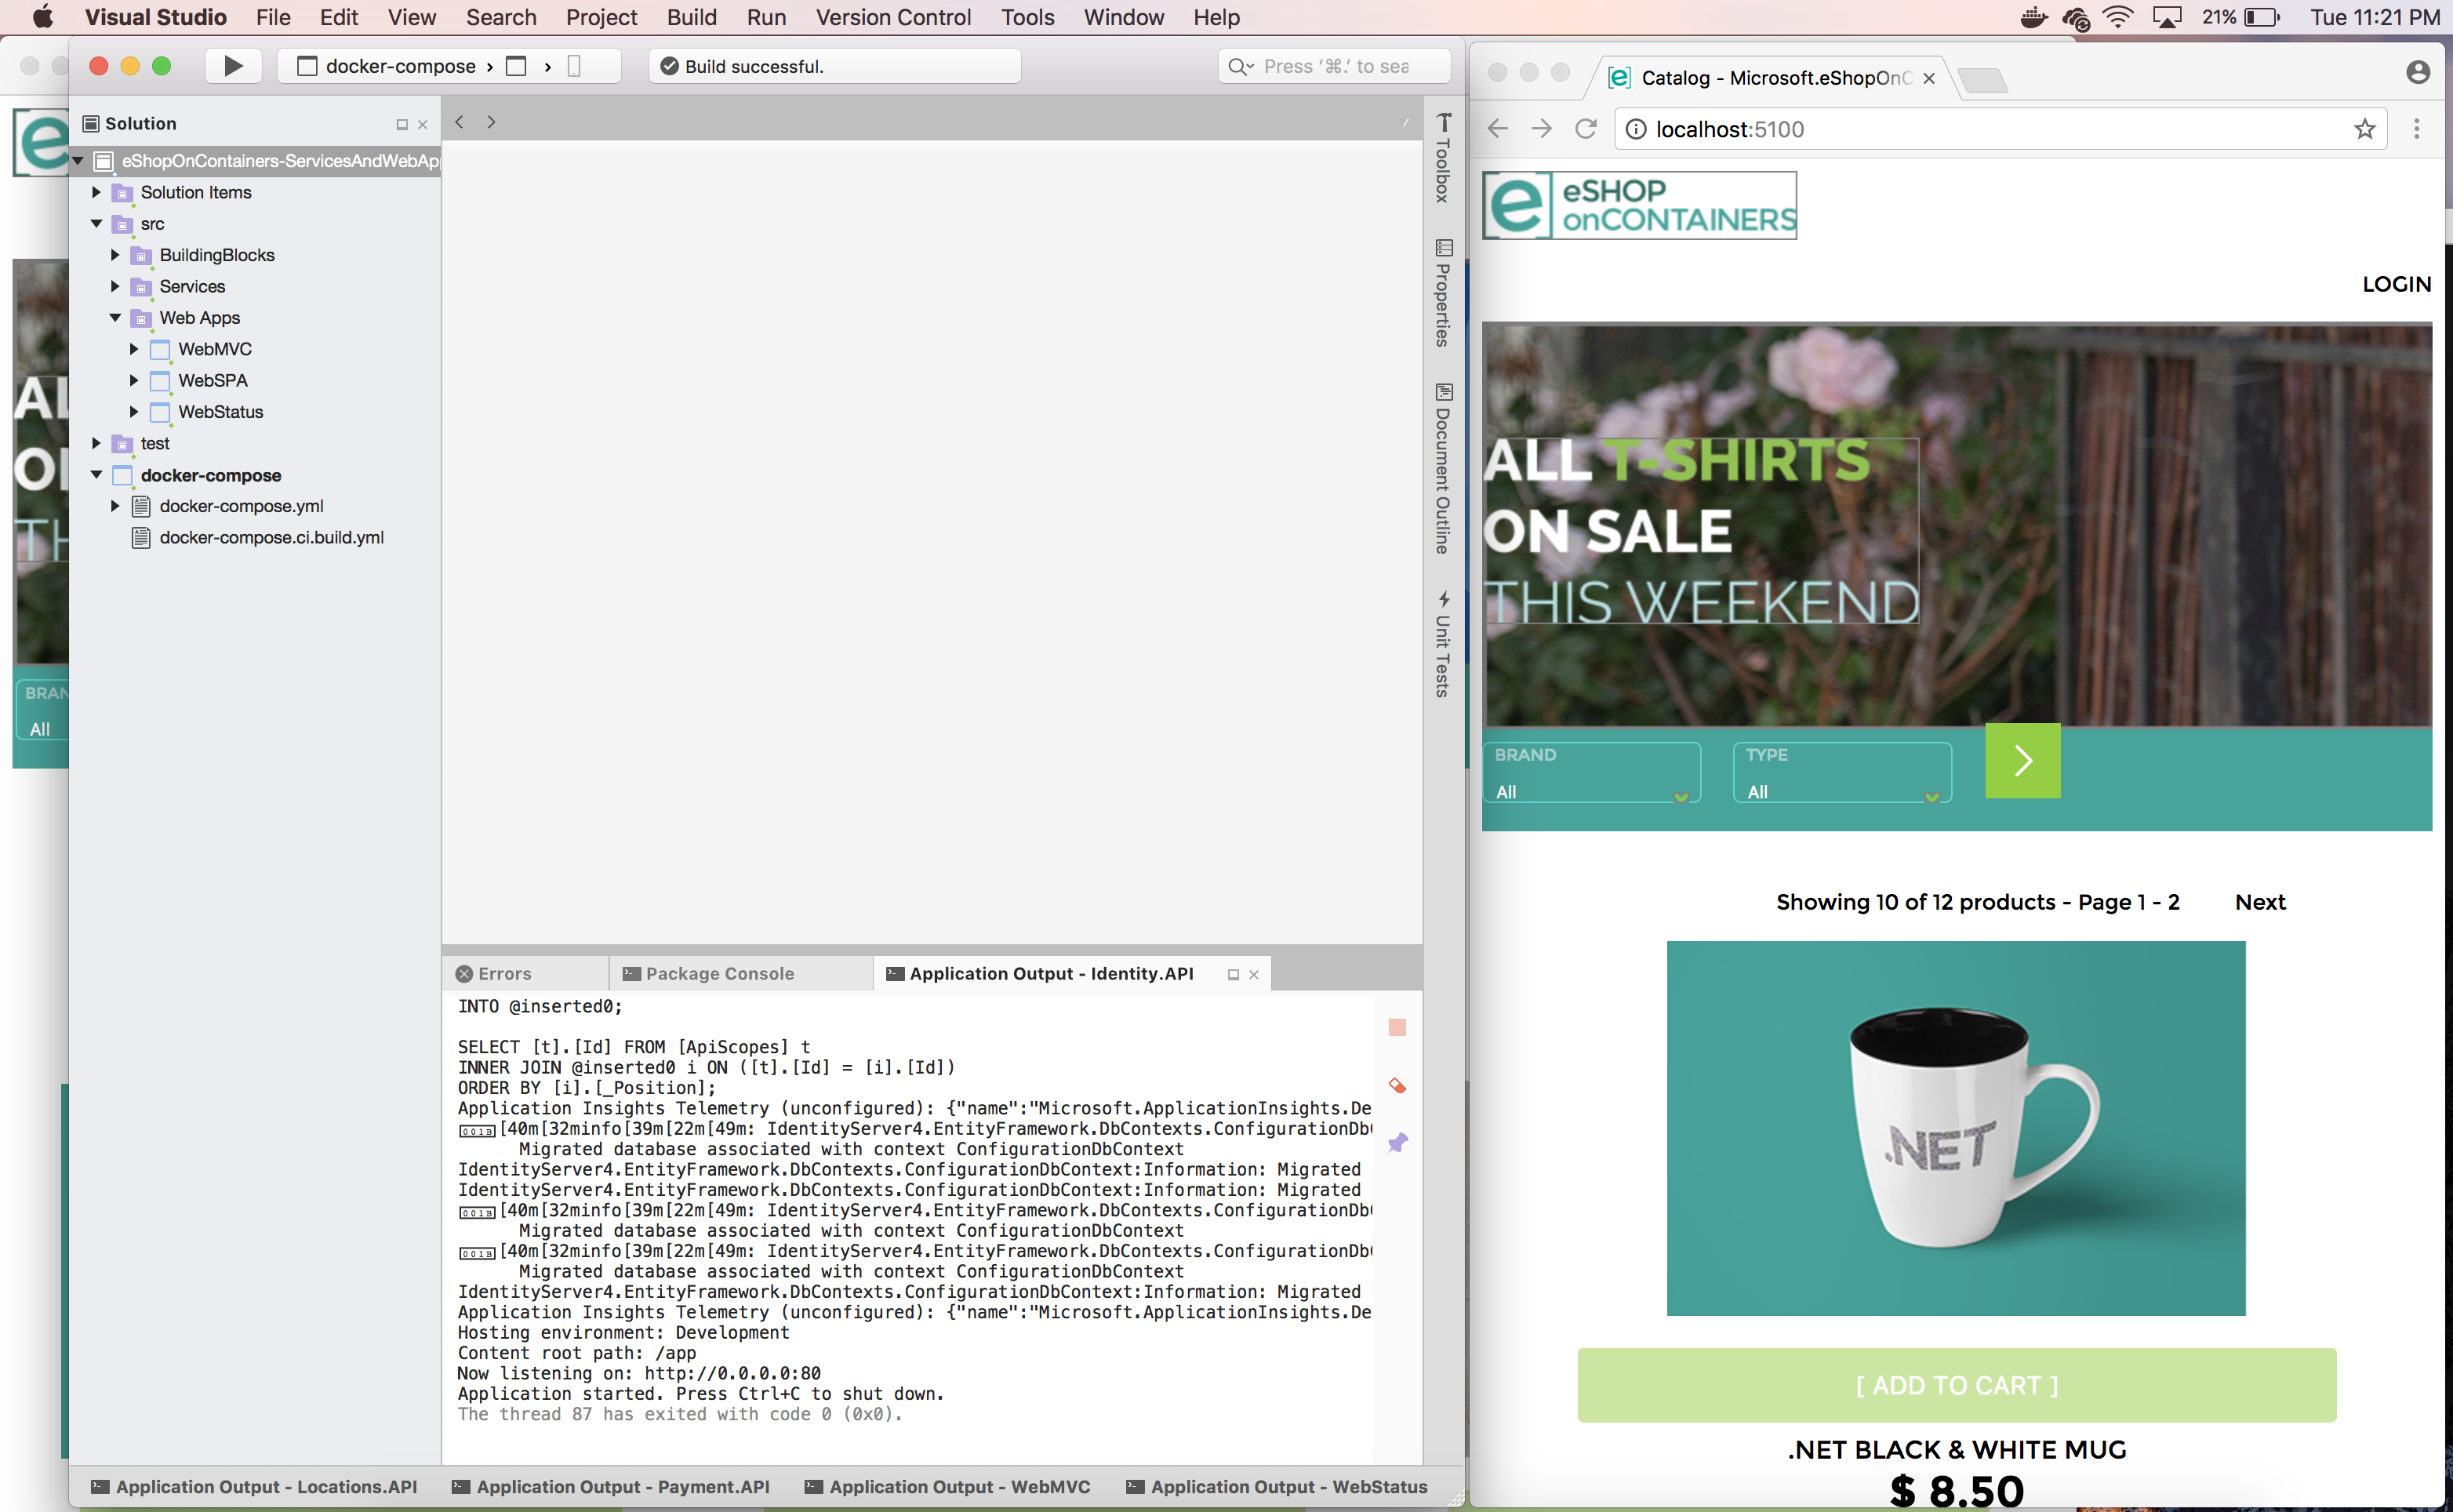
This is VS for Mac with the eShopOnContainers-ServicesAndWebApps.sln solution.

Make sure that the by default start-up project is the Docker project named docker-compose.
Hit Ctrl+F5 or press the "play" button in VS for Mac.
IMPORTANT: The first time you run eShopOnContainers, it will take longer than the next time you launch it. Under the covers, Docker is pulling quite a few "heavy" images from Docker Hub (the public image registry), like the SQL Server image, Redis image, RabbitMQ image and the base ASP.NET Core images. That pull/download process will take a few minutes. Then, VS will launch the application custom containers plus the infrastructure containers (SQL, Redis, RabbitMQ and MongoDB), populate sample data in the databases and finally run the microservices and web apps on custom containers.
Note that you will see normal/controlled Http exceptions caused by our retries with exponential backoff, as the web apps have to wait until the microservices are ready for the first time which need first to run SQL sentences populating sample data, etc.
Once the solution is up and running, you should be able to see it in the browser at:
If you open a bash window, you can type docker images and see the pulled/downloaded images plus the custom images created by VS for Mac:

And by typing docker ps you can see the containers running in Docker. The infrastructure containers like SQL, Redis, RabbitMQ plus the custom containers running Web API microservices and the web apps.

IMPORTANT: In order to have the full app working, like being able to login with a user and add items to the basket and create orders, or being able to consume the services from a remote Xamarin or web SPA, you need to configure additional steps for the app, like the IP to be used by the Identity Service because it needs to be redirected, etc. - Check the additional configuration at the end of this post.
You should be now ready to begin learning by exploring the code and debugging eShopOnContainers.
If using the services from remote apps, like the a phone with the Xamarin mobile app in the same Wifi network, or the web apps accessing remotely to the Docker Host, you need to change a few by-default URLs.
eShopOnContainers app uses the .env file to set certain by-default environment variables used by the multiple docker-compose.override you can have.
Therefore, the following change must be done in the .env file at the root of the eShopOnContainers folder. If you don't see the .env file, run the following command and re-start the Finder:
   $ defaults write com.apple.finder AppleShowAllFiles TRUE

   $ killall Finder
Then, edit the .env file (with VS code, for instance) and change the ESHOP_EXTERNAL_DNS_NAME_OR_IP variable, and instead of using "localhost" as value, set a real IP or a real DNS name:
 `
    ESHOP_EXTERNAL_DNS_NAME_OR_IP=192.168.0.25
 `
or
ESHOP_EXTERNAL_DNS_NAME_OR_IP=myserver.mydomain.com
This is something you'll want to do if deploying to a real Docker Host, like in a VM in Azure, where you can use a DNS name for that.