
Paul Thomas O'Riordan
This is a full-stack project built using Django, Python, HTML, CSS, and JavaScript. I have created this website for my fourth project of the codeinstitute's Diploma in FullStack Development. It is a web application that will allow users to share what they see as newsworthy and allow for user interaction and commenting similar to that of reddit.
- Project Aim
- User Experience
- Technical
- Features
- Marketing
- Bugs
- Technologies Used
- Testing
- Deployment
- Credits
- Acknowledgments
To create a web application which will allow users to share blog posts and news articles similar to reddit and other users will be able to like posts according to how important/newsworthy they think they are. Users will also be able to comment on posts and engage in a discussion as well as filtering posts by category.
This app enables authenticated users to save their information so that when they are logged in and want to leave a comment their username is pre-filled, creating an improved user experience. The UserProfile model has a one-to-one field that is linked to the Django AllAuth user account, upon logging in the model method create_or_update_user_profile creates the profile if it isn't already present in the model.
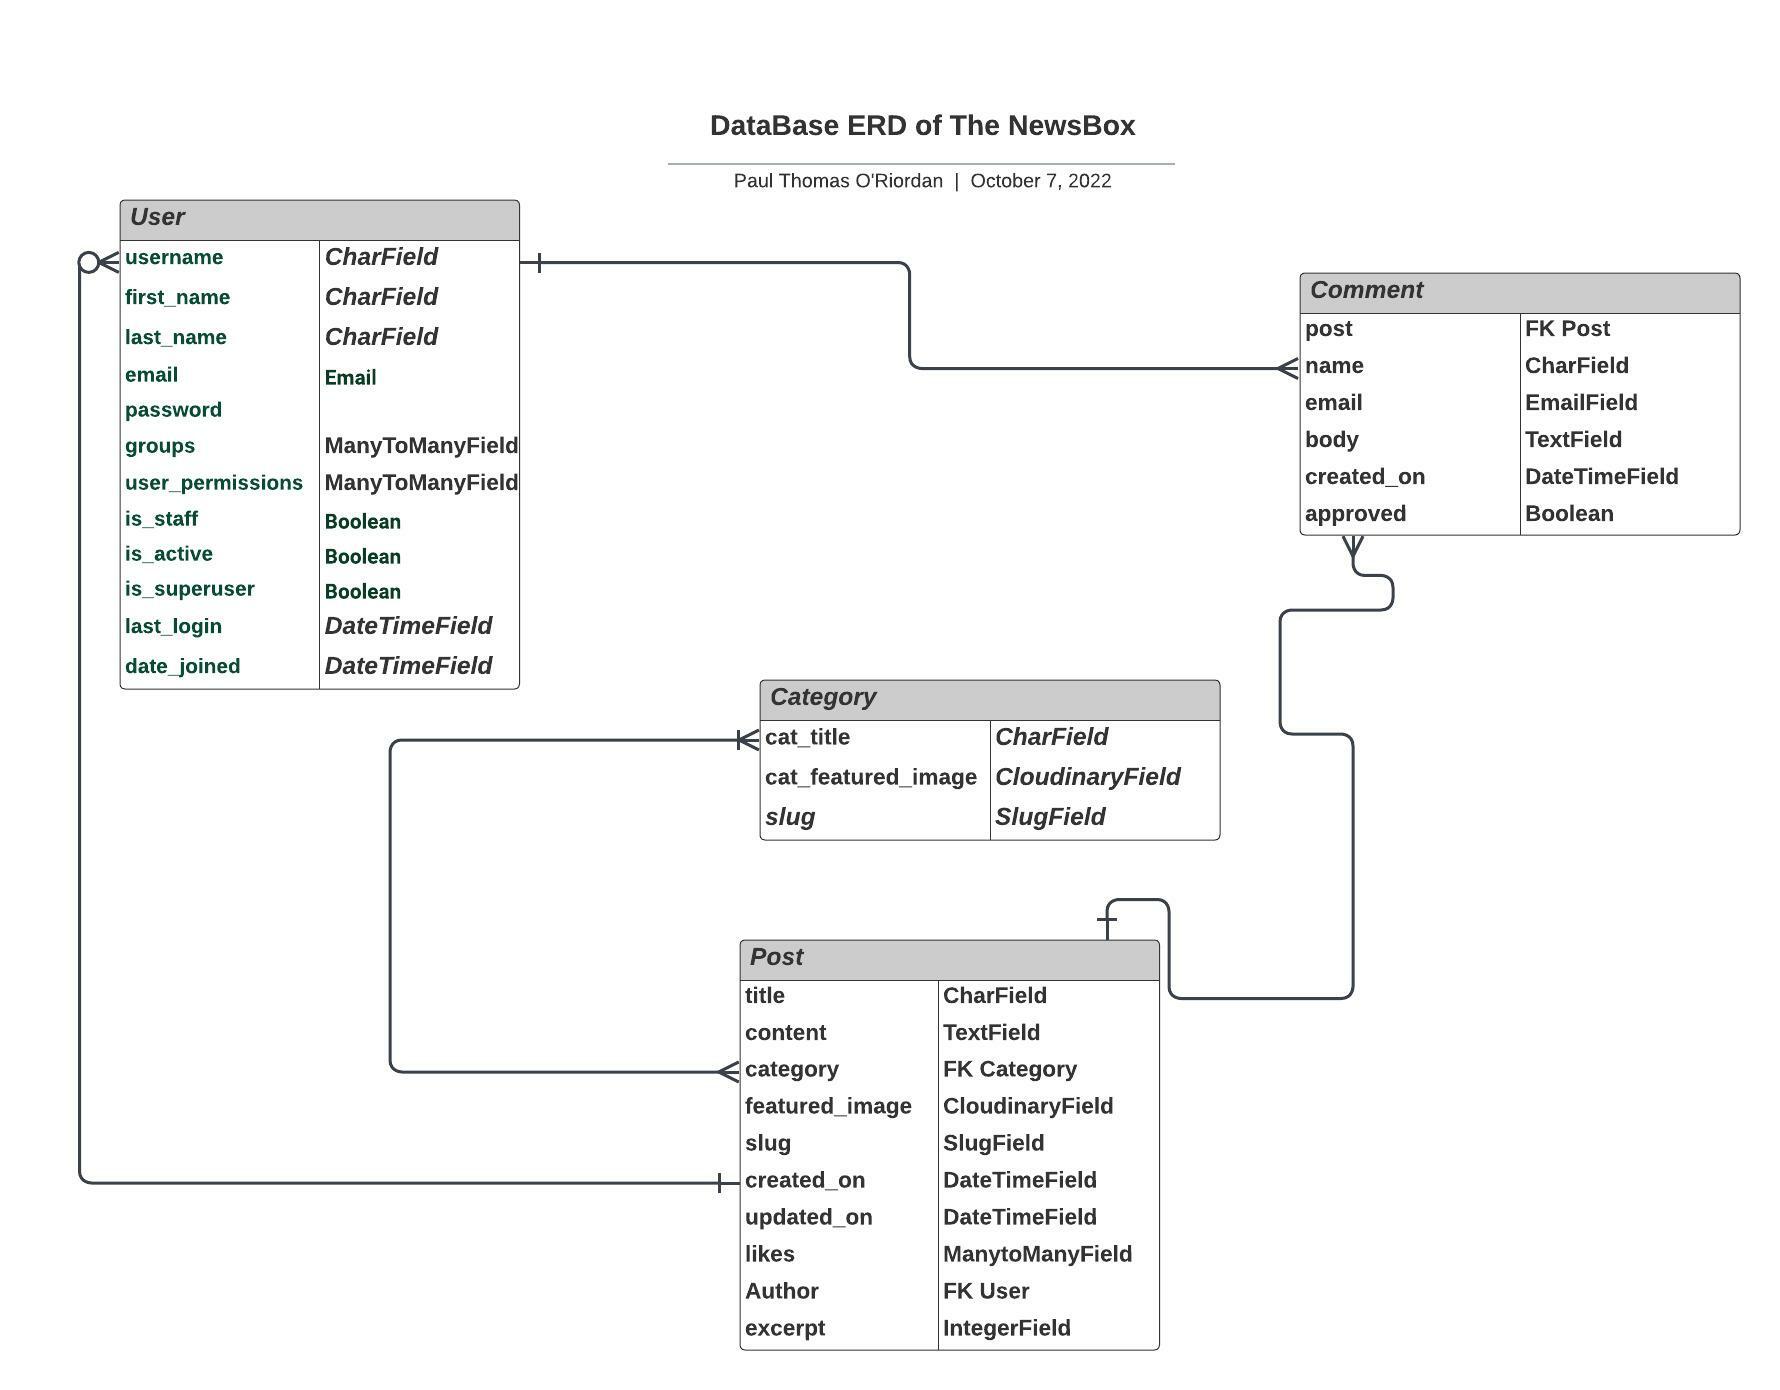
This app controls the main functionality associated with the web application. I have created three models to store the necessary data: Post, Comment & Category.
Category stores the various category types of posts e.g. sport, tech, politics etc. This allows the user to filter the posts by the category if they are looking for something specifically.
Post enables individual posts to be added to the database in order for them to be shown on the post detail page. Only users with accounts are able to access this functionality and it can be done from the front end using the AddPostView view.
Comment allows users to comment and interact with the website, allowing a disucussion within the community increasing engagment. The PostDetail view which allows user to see the full detail when a post headline/image is clicked on then has a post method which allows user to fill in the comment form and interact with the post and other users.
- A simple, straightforward, intuitive UX experience;
- Explicit content;
- An easy navigation for the user through all the pages and features;
- A site that is visually appealing on all screen sizes.
- A clear and straightforward layout is in place to ensure users can navigate intuitively and have an enjoyable browsing experience.
- Mobile navigation is the same on all pages to ensure easy navigation.
- Footer is fixed on the bottom with links to social media.
Design inspiration came from various google searches for blogs and templates, the "I think therefor I blog" walkthrough project on Code Institute as well as reddit- the main inspiration.
The project was developed from initial wireframes by hand and then these were expanded digitally. Each subsequent page after the home page has the same structure to ensure uniformity accross the site.
Click to see wireframes:
- EPIC: Viewing and navigation of the web app works as expected
- As a ... first time user... I want to be able to ... know what is expected of me on the home page. So that I can... easily navigate and find the information I am looking for.
- As a ... first time user... I want to be able to ... read posts and comments, So that I can... decide on whether or not I think it is worth signing up to.
- As a ... first time user... I want to be able to ... know how to sign up to the web site easily and create a profile. So that I can... post stories and engage and comment on other .posts.
- EPIC: Registration & User accounts work as expected
- As a ... Site User I want to be able to ... easily register a profile. So that I can... create a profile and access the main functionality of the site.
- As a ... Site User I want to be able to ... easily login/log out. So that I can... access my information without filling in forms every time and ensure the security of my account.
- As a ... Site User I want to be able to ... easily recover my password if I forget it. So that I can... recover access to my account.
- As a ... Site User I want to be able to ... receive a confirmation email after registering. So that I can... verify that my registration was successful.
- EPIC: Sorting & Searching work as expected
- As a ... Site User I want to be able to ... see different categories of posts. So that I can... identify specific posts and not waste time looking at other categories' posts.
- As a ... Site User I want to be able to ... search for a post by name or description. So that I can... find a specific post I'd like I am interested in.
- EPIC: Posting and commenting work as expected
- As a ... Site User I want to be able to ... create/read/update/delete a post. So that I can... alter how I would like my post to look to allow for maximum engagement.
- EPIC: Site management
- As a ... Site owner I want to be able to ... review all posts, categories, users, upvotes, downvotes, etc. So that I can... maintain the site and remove any offensive content.
- As a ... Site owner I want to be able to ... edit/update/delete a post. So that I can... maintain the site and remove any offensive content.
- As a ... Site owner I want to be able to ... direct users to my social profiles. So that I can... increase social interaction and attract new users.
- As a ... Site owner I want to be able to ... all areas of the site to function correctly and have no bugs. So that I can... ensure an enjoyable browsing experience for all newcomers.
- All functionality and development of this project will be managed through GitHub issues, milestones and projects, along with google sheets for initial conception.
-
Sprint 1 01/06/22 - 05/06/22 (Finished at 05/06/2022)
- Initial setup
- Install django
- Install Allauth
- Add Allauth templates to project templates
- Create base.html
- Create Home app
- Create index.html, view and style
- Create responsive navigation
- Add to README.md file
- Initial setup
-
Sprint 06/06/22 - 12/06/22 (Finished on 12/06/2022)
- Add Post app
- Set up all posts view
- Set up post detail view
- Set up add post
- Set up edit post
- Set up delete post
- Add Comment app
- Set up add comment
- Set up edit comment
- Set up delete comment
- Add Responsive footer
- Create footer layout
- Add Post app
-
Sprint 3 13/06/22 - 15/05/22 (Finished on 15/06/22)
- Add Categories app
- Set up neccessary views
-
Sprint 4 15/06/22- 20/06/22 (finished 20/06 2022)
- Customise allauth templates
- Set up templates
- Add CSS
- Add messages
- Set up messages with high z index
-
Sprint 5 revising the project and making neccesary fixes 26/09/22 - 09/10/22 (Finished on 09/10/22)
- Debug and fixes
- Remove heroku app and reset databases to run locally
- Add new model and databases
- Fix views to add login required, search and category sorting functionality
- Add email functionality for allauth
- Testing
- Document all testing, revise code and complete README.md and TESTING.md
- Responsive design.
- Website title and information on the site's purpose.
- Navigation Menu (Site Wide).
- Postgress databases to store information and user login/profile information.
- Cloudinary to store static files
- CRUD Functionality
- Login functionality.
- Logout functionality.
- Ability to view all posts.
- Ability to view post details.
- Ability to add and remove posts.
- Ability to Update posts.
- Ability to be able to search for posts
- Ability to sort by category
- Ability to like posts
- Ability to comment on blog posts and & delete comments.
- Admin creation and management of posts.
Importance and Difficulty
| Feature | Difficulty | Importance |
|---|---|---|
| Postgress databases to | 5 | 5 |
| store information and | ||
| user login/profile | ||
| information | ||
| :-------------------- | --------------- | --------------- |
| CRUD Functionality | 5 | 5 |
| :-------------------- | --------------- | --------------- |
| Admin creation and | 5 | 5 |
| management of Posts | ||
| :-------------------- | --------------- | --------------- |
| Ability to view all | 2 | 5 |
| posts. | ||
| :-------------------- | --------------- | --------------- |
| Ability to view | 2 | 5 |
| post details | ||
| :-------------------- | --------------- | --------------- |
| Ability to add and | 2 | 5 |
| remove a post | ||
| :-------------------- | --------------- | --------------- |
| Ability to update the | 3 | 5 |
| or remove a post | ||
| :-------------------- | --------------- | --------------- |
| Registered user can | 5 | 5 |
| add a post/comment. | ||
| :-------------------- | --------------- | --------------- |
| Login functionality | 3 | 5 |
| :-------------------- | --------------- | --------------- |
| Navigation Menu | 3 | 5 |
| (Site Wide) | ||
| :-------------------- | --------------- | --------------- |
| Responsive design | 2 | 5 |
| :-------------------- | --------------- | --------------- |
| Website title and | 1 | 5 |
| information on the | ||
| the site purpose | ||
| :-------------------- | --------------- | --------------- |
| Logout functionality | 1 | 5 |
| :-------------------- | --------------- | --------------- |
| Search functionality | 3 | 3 |
| :-------------------- | --------------- | --------------- |
| Like functionality | 3 | 3 |
As this is an educational project, it will not be maintained in the future. However, if it were a live site, some features that I would like to implement are listed below.
- Allow for the use of social sign ins.
- Better form validation.
- User permissions / groups to allow staff to have non-breaking access to the CMS.
- Further improve user experience.
- Add a FAQs, subscribers list, and contact section.
-
This site has a link to my Instagram Page with a link on the page footer.
-
This site has a link to my LinkedIn Page with a link on the page footer.
- Colours
The Colour scheme was generated using the eyedropper plugin to get one colour from the logo image and colours to create the colour palette. A simple pallette using grey black and white and complimented by bootstrap colors and classes was eventually decided on.
- Font Selection
Two complimentary fonts were chosen with Google Fonts to be used across the website.
The chosen fonts were Gloria Hallelujah for the logo and titles and Raleway for everything else on the site.
| Bug | Fix |
|---|---|
| The logo would not stay in the footer when changing screen sizes. | Removing redundant classes |
| When scrolling down I could see the footer halfway up the screen behind content. | Remove the html height - 80% in css |
| A search term was only searching the title. | I used Q __icontains and the pipe to signify or and added name and content. |
| When trying to like a post, the comment form was saying please fill in this field. | The if else statement had to have the final part moved outside the postLike form. |
| Message container was moving the hero image down when it appeared and not sitting on top of content | Add css and specifically z index and position to achieve this. |
| The categories drop down was not populating | Add correct template literals within the for loop. As well as adding the data-bs-toggle. |
| Static files were not loading in deployed project | Collect static after deployment. |
| Database not connected after deplyment | Heroku had done maintenance on their databases and the database_url variable had changed and needed to be updated in env.py. |
- HTML
- This project uses HTML as the main language used to complete the structure of the Website.
- CSS
- This project uses custom written CSS to style the Website.
- JavaScript
- JavaScript is used on multiple pages to manipulate the DOM.
- Python
- This projects core was created using Python, the back-end logic and the means to run/view the Website.
- Python Modules used (These can be found in the requirements.txt project file):
- Django
- This project was created using the Django framework, the back-end logic and the means to run/view the Website.
- Bootstrap
- The Bootstrap framework was used through the website for layout and responsiveness.
- Google Fonts
- Google fonts are used in the project to import the fonts for the site.
- GitHub
- GithHub is the hosting site used to store the source code for the Website, as well as github projects to manage the planning and implementation of all functionality using a kanban board.
- Gitpod
- Gitpod is used as version control software to commit and push code to the GitHub repository where the source code is stored.
- Heroku
- Heroku was used to deploy the live website.
- Google Chrome Developer Tools
- Google chromes built in developer tools are used to inspect page elements and help debug issues with the site layout and test different CSS styles.
- Font Awesome
- All the Icons displayed throughout the website are Font Awesome icons.
- Favicon
- Favicon.io was used to make the site favicon
- Am I Responsive
- Multi Device Website Mockup Generator was used to create the Mock up image in this README
- Cloudinary
- Cloudinary is an end-to-end image and video-management solution for websites and mobile apps, covering everything from image and video uploads, storage, manipulations, optimizations to delivery.
- humanize
- Provides an easy human readable time format when viewing posts.
- crispyforms
- To render django forms in an elegant manner and one which interacts very well with bootstrap styling.
Testing is required on all features and user stories documented in the TESTING.md file linked from this README below as the testing is a large section. All clickable links must redirect to the correct pages. All forms linked to the database must be tested to ensure they insert all given fields into the correct collections.
HTML Code must pass through the W3C HTML Validator.
CSS Code must pass through the W3C CSS Validator.
JavaScript code must pass through the JSHint Validator.
Python Code must pass through PEP8 Validator
The website was extensively tested as it was developed using:
- print().
- The terminal by printing the expected outcome.
- Testing User Stories.
- Testing scenarios manually.
- Testing functionallity manually.
This project has been tested throughout its inception. Each input has been thoroughly tested to make sure that any invalid inputs are handled correctly and a response is shown to the user.
Full test results can be found here
This project was deployed through Heroku using the following steps:
Heroku needs to know which technologies are being used and any requirements, so I created files to let it know. Before creating the Heroku app, create these files using the following steps in GitPod:
- In the GitPod terminal, type
pip3 freeze --local > requirements.txtto create your requirements file. - Create your Procfile and insert the following code:
web: gunicorn newsbox86.wsgiand make sure there is no additional blank line after it. - Push these files to your repository.
- Log into Heroku
- Select 'Create New App' from your dashboard
- Choose an app name (if there has been an app made with that name, you will be informed and will need to choose an alternative)
- Select the appropriate region based on your location
- Click 'Create App'
- From the dashboard, click the 'Deploy' tab towards the top of the screen
- From here, locate 'Deployment Method' and choose 'GitHub'
- From the search bar newly appeared, locate your repository by name
- When you have located the correct repository, click 'Connect'
- Click the 'Settings' tab towards the top of the page
- Locate the 'Config Vars' and click 'Reveal Config Vars'
- Enter all variables needed.
- Go to the resources tab in Heroku.
- In the Add-ons search bar look for Heroku Postgres & select it.
- Choose the Hobby Dev-Free option in plans.
- Click submit order form.
- Go back to the build environment and install 2 more requirements:
pip3 install dj_databse_urlpip3 install psycopg2-binarymake sure to add these to the requirements file usingpip3 freeze > requirements.txt
- Go to settings.py and change the EMAIL_HOST_USER to your chosen email address.
- If you want to set up a new Gmail account for the site, this is the time to do so.
- Go to the Gmail account and open the 'Settings' tab.
- Go to 'Accounts and Imports' > 'Other Google Account Settings'.
- Go to the 'Security' tab and open 'Signing in to Google'.
- Click on '2-step Verification', click 'Get Started' and turn on 2-step verification following their instructions.
- Go to 'Security' > 'Signing in to Google' > 'App Passwords'.
- (You may have to input your account password again) Set 'App' to 'Mail', 'Device' to Other, and name it Django.
- The passcode that appears will be used in your Heroku variables.
- In Heroku, once all the variables are in place, locate 'Manual Deploy' > choose the master branch and click 'Deploy Branch'.
- Once the app is built (it may take a few minutes), click 'Open App' from the top of the page.
- Go back to the 'Deploy' tab and you can now click 'Enable Automatic Deployment'. Changes automatically deploy when you make a git push.
- Log in to GitHub and locate the GitHub Repository.
- At the top of the Repository above the "Settings" Button on the menu, locate the "Fork" Button.
- You will have a copy of the original repository in your GitHub account.
- You will now be able to make changes to the new version and keep the original safe.
- Log into GitHub.
- Locate the repository.
- Click the 'Code' dropdown above the file list.
- Copy the URL for the repository.
- Open Git Bash on your device.
- Change the current working directory to the location where you want the cloned directory.
- Type
git clonein the CLI and then paste the URL you copied earlier. This is what it should look like:$ git clone https://github.com/
- Press Enter to create your local clone.
You will need to install all of the packages listed in the requirements file you can use the following command in the terminal pip install -r requirements.txt which will do it for you.
- The project is broadly based on the I think therefor I blog project by the Code Institute and was used as a base for my project (https://github.com/Code-Institute-Solutions/Django3blog)
- The Blog functionality was built with help from (https://www.youtube.com/watch?v=XWbTKJeSgRQ&ab_channel=JamesQQuick) Codemy on youtube as well as (https://www.youtube.com/c/veryacademy) the very academys series on django blogs
- The navbar was built using references from (https://www.w3schools.com/css/css_navbar.asp)
- The blog was built using references from (https://djangocentral.com/building-a-blog-application-with-django/)
- Models were built with help from (https://www.youtube.com/c/CodeArtisanLab) Code Artisan Lab on youtube
- The footer was built using references from (https://mdbootstrap.com/docs/standard/navigation/footer/)
- Settings and variables were referenced using the official django docs (https://www.djangoproject.com/)
- Images - Most of the images used were taken from (https://unsplash.com)
- Here are the individual references
- (https://unsplash.com/photos/XJXWbfSo2f0)
- (https://unsplash.com/photos/-YHSwy6uqvk)
- (https://unsplash.com/photos/A5rCN8626Ck)
- (https://unsplash.com/photos/mQVWb7kUoOE)
- (https://unsplash.com/photos/tXiMrX3Gc-g)
- (https://unsplash.com/photos/ycVFts5Ma4s)
- (https://unsplash.com/photos/gVbOF8mdE3U)
- (https://unsplash.com/photos/JE4iHJE-knl)
- (https://unsplash.com/photos/Qnlp3FCO2Vc)
- (https://unsplash.com/photos/3Sf_G9mOgcQ)
- (https://unsplash.com/photos/NIAWQT3mB98)
- (https://unsplash.com/photos/_Zua2hyvTBk)
- (https://miro.medium.com/max/1400/1'izG4_OEG500Y42h953GuQA.jpeg)
- Code Institutes Tutor support for their help and guidance.
- My wife Ashley for her unwaivering support and advice.
- Students of Code Institute on slack that helped with certain bugs.