Selenium Hybrid Framework for nopCommerce Backend System
This project aims to create a Selenium Hybrid Framework using Python for automating the backend system of the nopCommerce demo website. The framework utilizes key technologies such as Selenium, PyTest, Page Object Module, and HTML Reports to achieve re-usability and maintainability of automation files.
A framework is an organized way of maintaining automation files where all files communicate with each other to perform specific tasks.
- Re-usability: Create automation scripts that can be reused across multiple test scenarios.
- Maintainability: Build a framework that is easy to maintain and update.
- Built-in/Pre-defined frameworks: pytest, robot framework, unittest, etc.
- Customized/User-defined frameworks: Data-Driven framework, keyword-driven framework, hybrid-driven framework.
-
Analyze Application, Technology & Skill Set
- Choose test cases based on the nopCommerce demo website.
- Identify re-test cases, regression cases, and automate able test cases.
- Note that 100% automation is not possible; certain scenarios like reports, captcha, and security-related cases require manual testing.
-
Design & Implementation of Framework
-
Execution
-
Maintenance (Version Control System)
- Front-end - For End Users / Customers: Front-end Demo
- Back-end - For Admin: Admin Demo
- Project Name:
nopCommerceAutomation
-
Open Terminal
-
Navigate to Your Project Directory:
-
Activate Virtual Environment: Once you're in the project directory, you can activate the virtual environment using the following command:
source venv/bin/activateIf you're using Windows, the command will be slightly different:
venv\Scripts\activate
-
Verify Activation: You'll know the virtual environment is activated when you see the environment name in parentheses at the beginning of your command prompt, something like
(venv) user@hostname:~/project$.
- Selenium
- Pytest
- Pytest-html
- Pytest-xdist : Run parallel execution use in CLI
-n 4,-n autoor-n=4 - Allure-pytest
- Openpyxl
- Pytest-repeat : repeat any test multiple times use in CLI
--count=4
pip install -r requirements.txtpip freeze > requirements.txt nopCommerceAutomation
├── pageObjects (package)
├── testCases (package)
├── utilities (package)
├── TestData (Folder)
├── Configurations (Folder)
├── Logs (Folder)
├── Screenshots (Folder)
├── Reports (Folder)
├── requirement.txt
├── pytest.ini
├── run.bat
- Create
LoginPage.pyunder "pageObjects"
- Create
test_login.py - run tests using below command, v for verbose, s for
pytest -v -s
The command pytest -v -s is used to run Python tests using the pytest framework with some specific options. Let's break down each part of the command:
pytest: This is the command to run tests using the pytest framework.-v(or--verbose): Increases test verbosity, showing more details about each test.-s(or--capture=no): Disables output capturing, allowing you to see the standard output during test execution.
conftest.py is a special Python file that is recognized by pytest as a configuration file. It is typically used to define fixtures, hooks, and other configurations that are shared across multiple test files within a pytest project.
Here are some common uses of conftest.py:
-
Fixtures Definition:
- Fixtures are a way to set up preconditions or provide data to tests.
conftest.pycan define fixtures that are shared across multiple test files.- Fixtures can be used to initialize resources, set up test data, or perform other setup tasks.
# Example conftest.py
import pytest
from selenium import webdriver

@pytest.fixture
def browser():
    driver = webdriver.Chrome()
    yield driver
    driver.quit()
In this example, the
browserfixture provides a Selenium WebDriver instance for tests, and it is available to any test file within the same project. -
Hooks:
- Pytest allows you to define hooks that are executed at different stages of the testing process.
- Hooks can be defined in
conftest.pyto perform setup or teardown tasks.
# Example conftest.py
def pytest_runtest_setup(item):
    # Code to execute before each test
    pass

def pytest_runtest_teardown(item):
    # Code to execute after each test
    pass
In this example, the
pytest_runtest_setupandpytest_runtest_teardownhooks are defined inconftest.pyto run setup and teardown tasks before and after each test. -
Plugin Initialization:
conftest.pycan also be used to initialize and configure pytest plugins.- Plugins can be activated or configured within the
conftest.pyfile.
# Example conftest.py
def pytest_configure(config):
    config.addinivalue_line("markers", "smoke: mark tests as smoke tests")
In this example, the
pytest_configurehook is used to add a custom marker to pytest, which can be used to tag tests as smoke tests.
- By organizing shared fixtures, hooks, and configurations in
conftest.py, you can create a centralized location for common testing infrastructure, promoting code reusability and maintainability across your pytest project.
- Implement screenshot capture in case of test failures as below.
if actual_admin_page_title == self.expected_admin_page_title:
            assert True
        else:
            self.driver.save_screenshot(".\\Screenshots\\test_loginPage.png")
            assert False
[common info]
base_URL = https://admin-demo.nopcommerce.com/login?ReturnUrl=%2Fadmin%2F
adminEmail = [email protected]
password = admin
import configparser
config = configparser.RawConfigParser()
config.read(".\\Configurations\\config.ini")


class ReadConfig:

    @staticmethod
    def getApplicationURl():
        url = config.get('common info', 'base_URL')
        return url

    @staticmethod
    def getAdminEmail():
        adminEmail = config.get('common info', 'adminEmail')
        return adminEmail

    @staticmethod
    def getAdminPassword():
        password = config.get('common info', 'password')
return passwordclass Test_001_Login:
base_URL = ReadConfig.getApplicationURl()
username = ReadConfig.getAdminEmail()
password = ReadConfig.getAdminPassword()
logger = LogGen.loggen()import logging
class LogGen:
@staticmethod
def loggen():
logger = logging.getLogger()
f_handler = logging.FileHandler(filename='.\\Logs\\automation.log', mode='a')
formatter = logging.Formatter('%(asctime)s - %(name)s - %(levelname)s - %(message)s', datefmt='%m/%d/%Y %I:%M:%S %p')
f_handler.setFormatter(formatter)
logger.addHandler(f_handler)
logger.setLevel(logging.INFO)
return loggerfrom utilities.customLogger import LogGen
class Test_001_Login:
logger = LogGen.loggen()
def test_homePageTitle(self, setup):
self.logger.info(f"************ Test running in {self.driver.capabilities['browserName']} browser ***************")
self.logger.info("*********** test_homePageTitle *************")- Command to run test in desired browser
pytest -v -s --browser chrome   # will test in chrome similarly use firefox,edge,safari, chrome is default
or
pytest -v -s test_loginpage.py --browser chrome
pytest -v -s --browser chrome
pytest -v -s --browser firefox
pytest -v -s --browser edge
pytest -v -s --browser safari
pytest -v -s
pytest-xdistpackage required for parallel test executionpip install pytest-xdist- This execution not required any code changes, run using CLI
pytest -n NCPU # no of parallel CPU
pytest -n 2 # two parallel execution at same time
pytest -n auto # it will auto deside required CPUs
pytest -v -s -n 2 --browser firefox
################ Pytest HTML Reports ########################
# It is hook for Adding Environment info to HTML Report
from pytest_metadata.plugin import metadata_key
def pytest_configure(config):
    metadata = config.pluginmanager.getplugin("metadata")
    if metadata:
        config.stash[metadata_key]['Project Name'] = 'nop Commerce'
        config.stash[metadata_key]['Module Name'] = 'Login Page'
        config.stash[metadata_key]['Tester'] = 'Santosh Kumar'


# It is hook for delete/Modify Environment info to HTML Report
@pytest.hookimpl(optionalhook=True)
def pytest_metadata(metadata):
    metadata.pop("JAVA_HOME", None)
metadata.pop("Plugins", None)pytest -v -s --html=Reports/report.html .\testCases\test_login.py --browser chrome
| Password | Expected Result | |
|---|---|---|
| [email protected] | admin | Pass |
| [email protected] | adm123 | Fail |
| [email protected] | admin123 | Fail |
| [email protected] | admin | Fail |
| [email protected] | admin123 | Fail |
- to read Excel data
import openpyxl


def get_row_count(file, sheet_name):
    workbook = openpyxl.load_workbook(file)
    sheet = workbook[sheet_name]
    return sheet.max_row


def read_data(file, sheet_name, row_num, column_no):
    workbook = openpyxl.load_workbook(file)
    sheet = workbook[sheet_name]
return sheet.cell(row=row_num, column=column_no).value- Create test case file for data driven testing
pytest -v -s -n=2 .\testCases\test_login_ddt.py --html=Reports/test_login_ddt.html --browser chrome
or
pytest -v -s .\testCases\test_login_ddt.py --html=Reports/test_login_ddt.html --browser chrome
or
pytest .\testCases\test_login_ddt.py
- Create POM
AddCustomerPage.pyinside pageObjects
Summary of Code:-
Purpose: This code defines a class named
AddNewCustomerfor automating the process of adding new customers on a web application using Selenium. -
Functionality:
- It provides methods to interact with various elements on the customer addition page such as email, password, first name, last name, gender, date of birth, company, tax exemption status, manager or vendor selection, account activation status, comment, newsletter subscription, and customer roles.
- Methods like
saveNewCustomer,saveAndContinueNewCustomer,getSuccessAlertOnSave,getFailureAlertOnSave, andgetBackToCustomerListhandle the saving of new customer data, alert messages, and navigation after saving.
-
Element Locators: The class contains XPath, ID, and Link Text locators for different elements on the web page, which are used by the methods to interact with those elements using Selenium WebDriver.
-
- Create 'GenerateRandomNewCustomerData.py' inside Utilities to generate random user data and save into csv file
-
generate_random_user: This function generates random customer data such as first name, last name, email, password, gender, birth date, company name, comment, tax exemption status, manager or vendor ID, account status, newsletter subscription, and customer role. It returns this data as a dictionary.
-
saveNewCustomerData2CSV: This function takes the generated customer data (in the form of a dictionary) and a filename as input. It checks if the file already exists. If it doesn't exist, it writes the header (field names) to the CSV file and then writes the data to it. If the file exists, it appends the data to the existing file.
-
- Create test suite
test_AddNewCustomer.pyinside testCases
This code defines a test classTest_AddNewCustomerfor adding a new customer.
Here's a summary of what it does:-
Setup:
- It imports necessary modules and classes including
LoginPage,AddNewCustomer,ReadConfig,LogGen, andGenerateRandomNewCustomerData. - It sets up the base URL, admin username, password, and logging configuration.
- The test method
test_AddNewCustomeris defined within this class.
- It imports necessary modules and classes including
-
Test Execution:
- The test starts by logging in to the application using the admin credentials.
- After successful login, it navigates to the "Add New Customer" page.
- It generates random customer data using the
generate_random_userfunction from theGenerateRandomNewCustomerDatamodule. - The generated data is then filled into the corresponding fields on the "Add New Customer" page.
- After filling the data, it saves the new customer information.
- It checks for success or failure alert messages after saving.
- Screenshots are captured based on the test result.
- Test results are logged.
- Assertions are made based on the success or failure of the test.
# Function to generate random data for new customer
import random
import string
from datetime import datetime, timedelta

def generate_random_user():
    first_names = ["Rupa", "Pawan", "Priyanka", "Pankaj", "Arun"]
    last_names = ["Singh", "Yadav", "Sharma", "Saini", "Pandey"]

    first_name = random.choice(first_names)
    last_name = random.choice(last_names)

    random_number = str(random.randint(100, 999))
    email = f"{first_name.lower()}_{last_name.lower()}{random_number}@gmail.com"

    password_length = 8
    password_characters = string.ascii_letters + string.digits
    password = ''.join(random.choice(password_characters) for i in range(password_length))

    gender = "Female" if first_name in ['Rupa', 'Priyanka'] else "Male"

    today = datetime.now()
    birth_date = today - timedelta(
        days=random.randint(18 * 365, 60 * 365))  # Assuming a person can be between 18 and 60 years old
    formatted_birth_date = birth_date.strftime('%m-%d-%Y')

    comment = "Random comment for user " + first_name + " " + last_name

    return {
        "first_name": first_name,
        "last_name": last_name,
        "email": email,
        "password": password,
        "gender": gender,
        "birth_date": formatted_birth_date,
        "company_name": random.choice(['TCS', 'Walmart', 'Wipro', 'HCL']),
        "comment": comment,
        "tax_exempt": random.choice([True, False]),
        "manager_vendor": random.choice(['1', '2']),
        "account_status": random.choice([True, False]),
        "newsletter": [random.choice(["Your store name", "Test store 2"])],
        "customer_role": [random.choice(["Registered", "Guests"])]
    }
# Handle single Select dropdown
manager_vendor = Select(driver.find_element(By.ID, vendor_select_id))
manager_vendor.select_by_index(2)
# Handle Multi Select Dropdown
customer_roles_select_id = "SelectedCustomerRoleIds"
select_element = driver.find_element(By.ID, customer_roles_select_id)

# Open the dropdown using JavaScript, must for multi select dropdown, if not working with comman method
driver.execute_script("arguments[0].style.display='block'; arguments[0].click();", select_element)
select_option = Select(select_element)
select_option.deselect_all()

# Select desired options
for option in ['Administrators', 'Registered', 'Vendors']:
    select_option.select_by_visible_text(option)
-
- Search by Email, First Name, Last Name, Birth Date, Registration date, last activity date, company name, customer role
- Create POM
SearchCustomer.pyinside pageObjects-
Search Form Interaction: The
SearchCustomerclass manages interactions with a web page's search form using Selenium, allowing users to input search criteria like email, names, dates, and roles. -
Criteria Handling: It offers methods to set various search criteria and execute searches, including email, names, birthdates, registration dates, company, IP address, and customer roles, enabling precise queries.
-
Automation Efficiency: By leveraging Selenium's WebDriver, it facilitates efficient automation of search operations, including clicking the search button and retrieving results from the table.
-
- Create Test suite
test_SearchCustomer.pyinside testCases-
Fixture Setup: The code sets up fixture
search_setup, initializing the test environment by logging in, navigating to the search page, and maximizing the window. -
Search Setup: Defines a method
search_customer_setupfor setting up search criteria and verifying search results. It logs test case details, sets search parameters based on input, performs the search, captures screenshots for pass/fail cases, and asserts the outcome. -
Test Cases: Multiple test methods (
test_search_by_email,test_search_by_firstname, etc.) are defined to execute specific searches using different criteria (email, first name, last name, etc.) utilizing thesearch_customer_setupmethod. Each test method provides input data and expected outcomes for the search criteria.
-
****************** Till Here Design and Implementation Completed ******************************
@pytest.mark.sanity
@pytest.mark.regression# pytest.ini
[pytest]
markers =
sanity
regressionpytest -v -s -m "sanity"
pytest -v -s -m "regression"
pytest -v -s -m "sanity and regression"
pytest -v -s -m "sanity or regression"
pytest -v -s -m "sanity" --html=.Reports/Sanity_test_report.html --browser edge
- Here
andthose test cases have both sanity and regression mark will execute from all the test cases
@pytest.mark.sanity
@pytest.mark.regression
def test_loginPageTitle(self, setup):
self.driver = setupormeans those test cases have either sanity or regression will execute from all the test cases
@pytest.mark.sanity
def test_AddNewCustomer(self, setup):

# or

@pytest.mark.regression
def test_login_ddt(self, setup):- Paste the same command above command as required or modify as per required.
- Comment in batch file
REMand::, use any one
REM This is a comment using the REM command.
:: This is a comment using the :: command.- Paste the below command in run.bat and save it. No,IDE or browser required to keep open.
- Double click on bat file to run,
# run.bat
pytest -v -s -m "sanity" --html=Reports/testReport.html --browser edge
:: pytest -v -s -m "regression" --html=Reports/Test_Report.html --browser chrome
:: pytest -v -s -m "sanity and regression" --html=Reports/Test_Report.html --browser edge
:: pytest -v -s -m "sanity or regression" --html=Reports/Test_Report.html --browser edge
:: pytest -n=3 "sanity"
:: pytest "regression" --browser chrome --count=3
if above code giving error like pytest is not recognized as an internal or external command, operable program or batch file.
First mention project path of virtual env followed by pytest command and save it to batch file run.bat and open or double click to run
C:\Projects\Python\nopCommerceAutomation\venv\Scripts\pytest -v -s -m "sanity" --html=Reports/testReport.html --browser edge
- Multiple commands can also be run in batch file, it will run in sequence only, like first comment will execute then second and third command.
C:\Projects\Python\nopCommerceAutomation\venv\Scripts\pytest -v .\testCases\test_SearchCustomer.py::Test_SearchCustomer_003::test_search_by_email --browser chrome
C:\Projects\Python\nopCommerceAutomation\venv\Scripts\pytest -v .\testCases\test_SearchCustomer.py::Test_SearchCustomer_003::test_search_by_firstname --browser edge
C:\Projects\Python\nopCommerceAutomation\venv\Scripts\pytest -v .\testCases\test_SearchCustomer.py::Test_SearchCustomer_003::test_search_by_lastname --browser firefox
Let's break down Git, GitHub, and Jenkins workflows separately, and then discuss how they can work together:
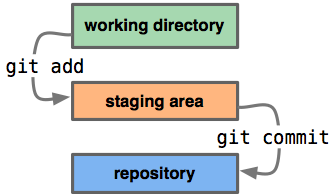
Git is a distributed version control system used for tracking changes in source code during software development. Here's how it works:
-
Repository: A Git repository is a collection of files and their history. It resides either locally on a developer's machine or remotely on a server.
-
Commits: Developers make changes to files in their local repository and create commits to save those changes. Each commit represents a snapshot of the files at a particular point in time.
-
Branches: Git allows developers to work on multiple versions of a project simultaneously through branches. Branches are independent lines of development that can be merged back into the main codebase.
-
Merging and Pull Requests: When a developer completes work on a branch, they can merge it back into the main codebase through a merge operation. In collaborative environments, developers often use pull requests to propose changes, discuss them, and merge them into the main branch.
GitHub is a web-based platform built around Git that provides hosting for Git repositories and collaboration features. Here's how it works:
-
Remote Repository Hosting: GitHub hosts remote Git repositories, allowing developers to store their code in the cloud and collaborate with others.
-
Pull Requests and Code Reviews: GitHub provides features for creating pull requests, reviewing code, and discussing changes collaboratively. This facilitates code review processes and ensures high-quality contributions.
-
Issue Tracking and Project Management: GitHub includes issue tracking and project management tools that help teams organize their work, track bugs, and plan releases.
Jenkins is an open-source automation server used for building, testing, and deploying software. Here's how it works:
-
Jobs: Jenkins jobs are individual tasks that automate various aspects of the software development process, such as compiling code, running tests, and deploying applications.
-
Build Pipelines: Jenkins allows users to define pipelines, which are sequences of jobs that define the entire software delivery process. Pipelines can include stages for building, testing, and deployment, with conditional logic and parallel execution.
-
Integration with Version Control Systems: Jenkins integrates with version control systems like Git to trigger builds automatically whenever changes are pushed to a repository. This ensures that code is continuously tested and integrated into the project.
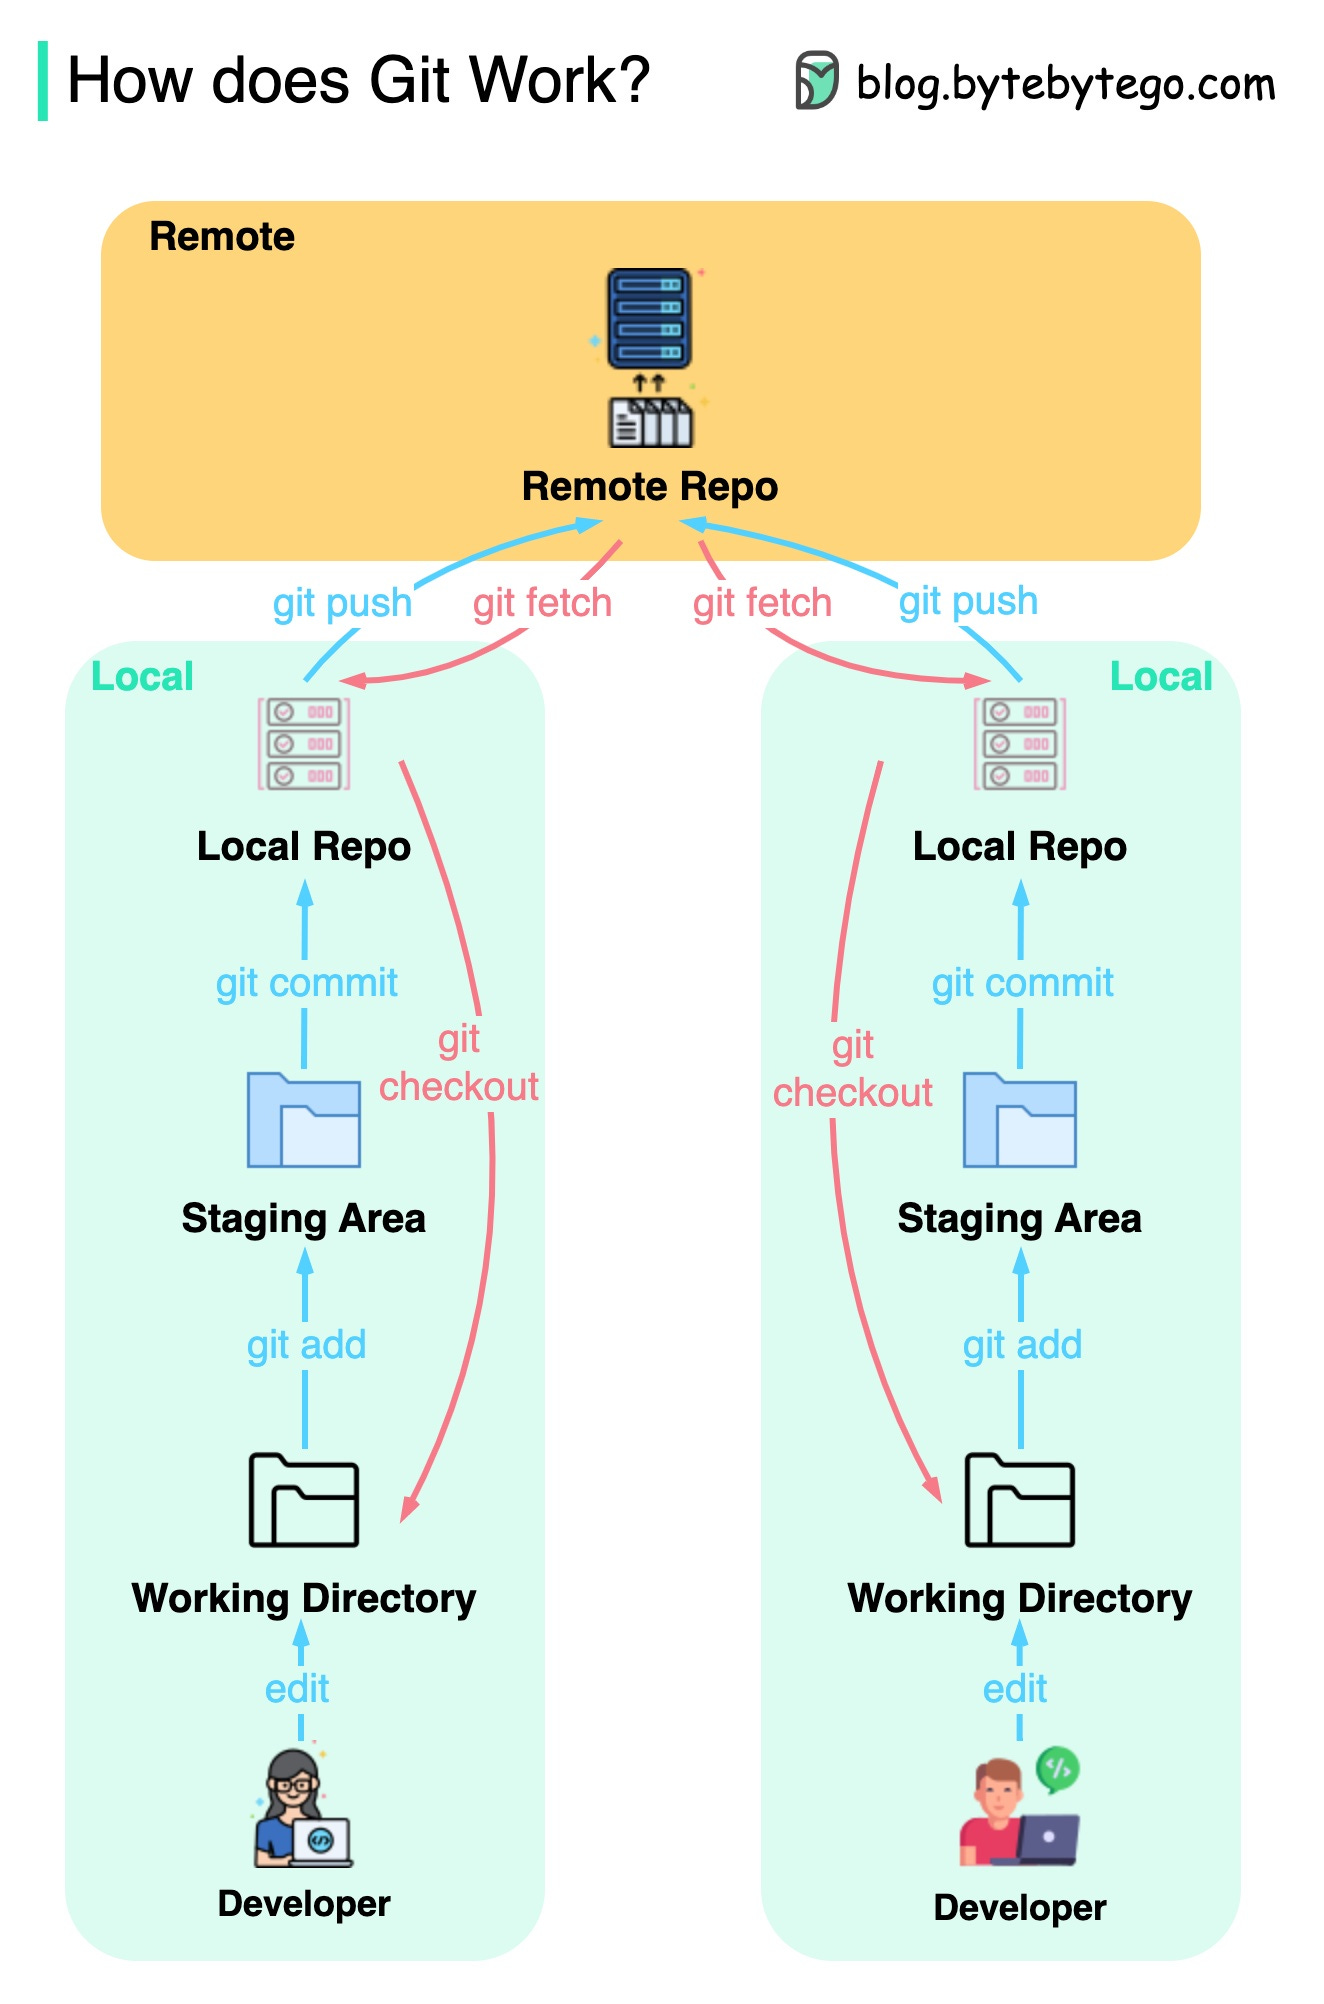
When combined, Git, GitHub, and Jenkins form a powerful workflow for software development:
-
Version Control with Git and GitHub: Developers use Git for version control, making changes locally and pushing them to GitHub for collaboration and backup.
-
Continuous Integration with Jenkins: Jenkins monitors GitHub repositories for changes and automatically triggers build and test jobs whenever new code is pushed. This ensures that changes are tested continuously and integrated into the codebase as soon as possible.
-
Automated Deployment: Jenkins can also handle deployment tasks, allowing teams to automate the process of releasing new versions of their software.
-
Collaboration and Code Review: GitHub's pull request and code review features facilitate collaboration among team members, ensuring that changes are reviewed and discussed before being merged into the main codebase.
In summary, Git provides version control, GitHub offers collaboration features and remote repository hosting, and Jenkins automates the build, test, and deployment process, creating a seamless workflow for software development.
Certainly! Let's walk through a simplified example of how Git, GitHub, and Jenkins can work together in a software development workflow, using commands and code snippets where appropriate.
-
Initialize a Git Repository:
git init my_project cd my_project -
Add and Commit Changes:
touch README.md git add README.md git commit -m "Initial commit" -
Create and Switch to a New Branch:
git checkout -b feature-branch
-
Make Changes and Commit:
# Make changes to files
git add .
git commit -m "Add new feature"
-
Push Changes to GitHub:
git push origin feature-branch
-
Create Pull Request:
- Create a new pull request on the GitHub web interface.
- Describe the changes and request a review from team members.
-
Code Review and Discussion:
- Team members review the pull request, provide feedback, and discuss changes.
- Make any necessary modifications based on feedback.
-
Merge Pull Request:
- Once the changes are approved, merge the pull request into the main branch on GitHub.


-
Set Up Jenkins Job:
- Create a new Jenkins job and configure it to monitor the GitHub repository for changes.
-
Define Build Steps:
- Define build steps in the Jenkins job configuration, such as compiling code, running tests, and generating artifacts.
-
Trigger Builds Automatically:
- Configure the Jenkins job to trigger builds automatically whenever changes are pushed to the GitHub repository.
-
View Build Results:
- Monitor the Jenkins dashboard to view build results and logs.
- Receive notifications for build failures or successes.
-
Developer Pushes Changes to GitHub:
- After making changes and committing them locally, the developer pushes the changes to the GitHub repository.
git push origin feature-branch
-
Jenkins Triggers Build:
- Jenkins detects the new changes on GitHub and triggers a build job automatically.
-
Build, Test, and Deploy:
- Jenkins executes the build steps defined in the job configuration, including compiling code, running tests, and generating artifacts.
- If the build is successful, Jenkins can automatically deploy the application to a staging environment.
-
Review and Merge Pull Request:
- Team members review the changes on GitHub, discuss them, and merge the pull request into the main branch once approved.
-
Jenkins Continuous Integration:
- Jenkins continues to monitor the GitHub repository for new changes and repeats the build process whenever new commits are pushed.
This integrated workflow ensures that changes are tested automatically, reviewed by team members, and integrated into the codebase efficiently.
- Project Code : in local system
- Project -> File Structure -> Code
- Git: Local Repository
- Code inside a local repository, it can be on local system or server
- Commands to create git repository
git init git add . git commit -m "Commit message" git remote add origin https://github.com/santos-k/nopCommerce-Automation-Project.git - GitHub : Remote/Global Repository
- code to remote server like github.com
- Command to push git on GitHub
git push -u origin master - Jenkins: automation server used for building, testing, and deploying software
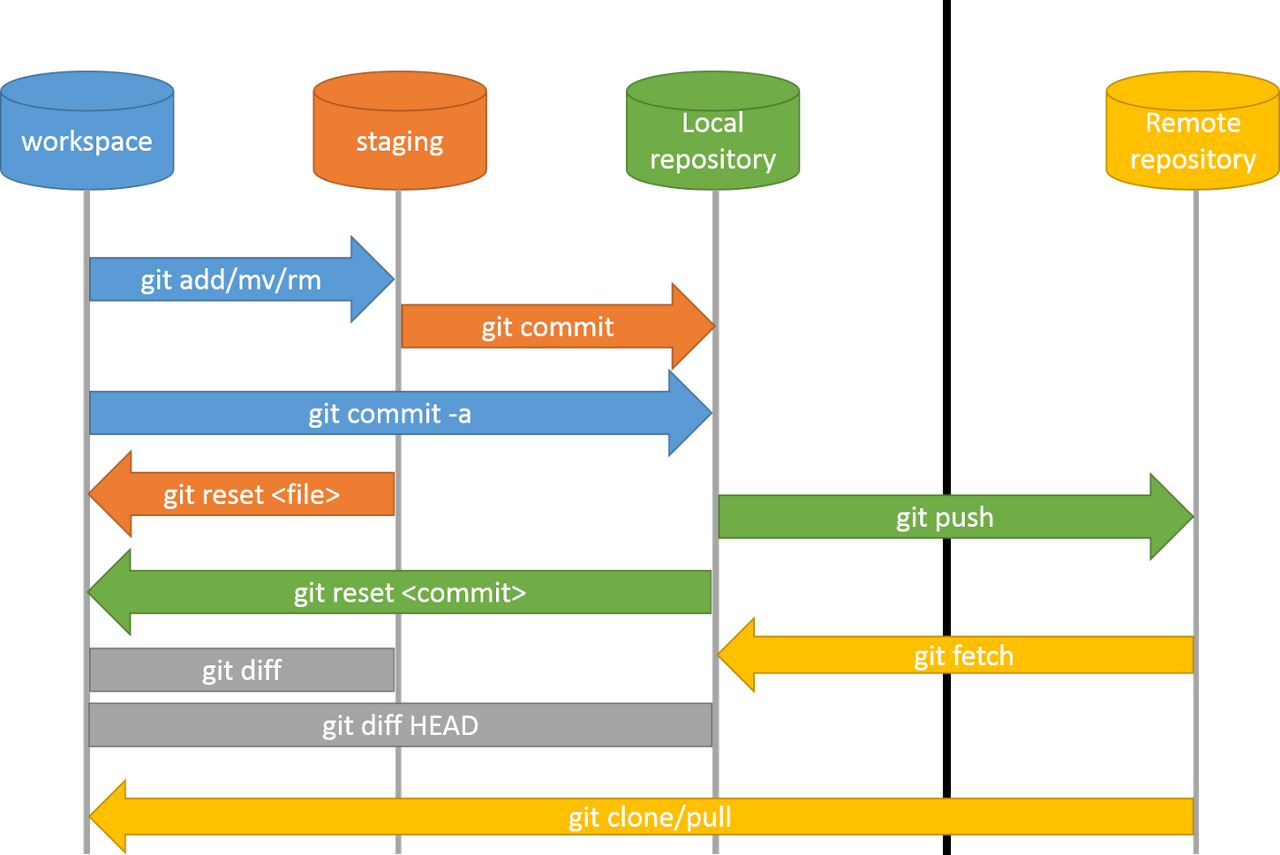
- git config: Set or get configuration options.
- Example:
git config --global user.name "John Doe"
- Example:
- git init: Create an empty Git repository or reinitialize an existing one.
- Example:
git init
- Example:
- git add: Add file contents to the index.
- Example:
git add myfile.txt
- Example:
- git status: Show the working tree status.
- Example:
git status
- Example:
- git commit: Record changes to the repository.
- Example:
git commit -m "Initial commit"
- Example:
- git branch: List, create, or delete branches.
- Example:
git branch mybranch
- Example:
- git checkout: Switch branches or restore working tree files.
- Example:
git checkout mybranch
- Example:
- git merge: Join two or more development histories together.
- Example:
git merge mybranch
- Example:
- git remote: Manage set of tracked repositories.
- Example:
git remote add origin <remote_URL>
- Example:
- git fetch: Download objects and refs from another repository.
- Example:
git fetch origin
- Example:
- git pull: Fetch from and integrate with another repository or a local branch.
- Example:
git pull origin master
- Example:
- git push: Update remote refs along with associated objects.
- Example:
git push origin master
- Example:
- git reset: Reset current HEAD to the specified state.
- Example:
git reset --hard HEAD~1
- Example:
- git revert: Create new commit that undoes changes made in the specified commit.
- Example:
git revert HEAD
- Example:
- git log: Show commit logs.
- Example:
git log
- Example:
- git diff: Show changes between commits, commit and working tree, etc.
- Example:
git diff HEAD~1 myfile.txt
- Example:
- git tag: Create, list, delete, or verify a tag object signed with GPG.
- Example:
git tag v1.0.0
- Example:
- git clone: Clone a repository into a new directory.
- Example:
git clone <repository_URL>
- Example:
- This is not an exhaustive list, but it covers many of the common Git commands and their basic usage.
Jenkins-CI Tool Setup Guide
-
Accessing Jenkins
- Open Jenkins in a browser by navigating to
http://localhost:8080/. - Log in with the default credentials:
admin:admin.
- Open Jenkins in a browser by navigating to
-
Project Setup
-
Running GitHub Project in Jenkins:
- Click on New Item to create a new project.
- Enter the desired project name and select Freestyle Project.
- Click OK and wait for the configuration page to appear.
- Configure project settings:
- Under General Tab:
- Provide a description if needed.
- Select Git under Source Code Management.
- Paste the GitHub repo URL in the
Repositoriessection. - Specify the branch name in
Branches to Buildsection.
- Paste the GitHub repo URL in the
- Under Build Steps, select Execute Windows batch command.
- Enter
run.bator the required command to execute.
- Enter
- Configure Post-build Actions (e.g., Email Notifications) if needed.
- Click Apply and then Save.
- Under General Tab:
-
Configuring Git for Jenkins - One Time setup for all projects:
- Copy the git.exe path from the local system (e.g.,
C:\Program Files\Git\bin\git.exe). - Navigate to Jenkins Dashboard > Manage Jenkins > Tools > Git.
- Paste the Git/bin path into the
Path to Git Executable. - Click Apply and then Save.
- Copy the git.exe path from the local system (e.g.,
-
Running the Build:
- Click on Build Now to run the build inside the Jenkins project, or inside the Dashboard, click on Build button in the same project row to trigger the build.
-
-
Jenkins Admin Password
- Access the Jenkins admin password from
C:\Users\withu\.jenkins\secrets\initialAdminPassword.
- Access the Jenkins admin password from
1. Jenkins Installation Methods: 1.1 With WAR File:
- Deployment from Command Prompt
- Navigate to the Jenkins directory
- Run
java -jar jenkins.war - Jenkins remains running until the Command Prompt is open
- Browser opens automatically for Selenium tests
1.2 Using Jenkins Windows Installer:
- Install Jenkins as a Windows service
- Automatically starts on system boot/reboot
- Tests run in headless mode
2. Additional Jenkins Commands:
2.1 Managing Jenkins Processes:
- Stopping Jenkins:
.\jenkins.exe stop - Starting Jenkins:
.\jenkins.exe start - Restarting Jenkins:
.\jenkins.exe restart
2.2 Jenkins Shutdown Best Practices:
- Avoid direct shutdown of Java process or Windows service
- Use Jenkins' built-in shutdown mechanism
- Access Jenkins via HTTP for safe shutdown
- Commands include
exit,restart, andreload - Example:
http://localhost:8080/exitto stop Jenkins running on port 8080.
2.3 Starting Jenkins from Command Line:
- Open Command Prompt
- Navigate to the directory with
jenkins.war - Run
java -jar jenkins.war
Till here folder structure:
nopCommerceAutomation
│
├── Configurations
│   ├── config.ini
│
├── Logs
│   ├── automation.log
│
├── pageObjects
│   ├── AddNewCustomerPage.py
│   ├── LoginPage.py
│   ├── SearchCustomerPage.py
│
│
├── Reports
│   ├── Sanity_Test_Report.html
│   └── testReport.html
│
├── Screenshots
│   ├── AddNewCustomer_Fail.png
│   ├── test_login_DDT_aNEe_Fail.png
│   └── test_login_DDT_aNEe_Pass.png
│
├── testCases
│   ├── conftest.py
│   ├── test_AddNewCustomer.py
│   ├── test_login.py
│   ├── test_login_ddt.py
│   └── test_SearchCustomer.py
│
├── TestData
│   ├── NewCustomerData.csv
│   └── nopCommerce_testdata.xlsx
│
├──utilities
│   ├── customLogger.py
│   ├── ExcelUtils.py
│   ├── GenerateRandomNewCustomerData.py
│   └── readProperties.py
├── requirement.txt
├── pytest.ini
└── run.bat