


Node.js spends so much of its time running inside virtualized instances, I figured it'd be fun to let it have its very own Raspberry Pi for an opportunity to talk directly to some hardware sensors: GPS, luminosity, ambient temperature, ambient humidity, and barometric pressure. Includes some fun stuff like calculating the local timezone offset and sunrise/sunset times at the reported GPS location, as well as support for publishing data to "the cloud" for real-time and historical data reporting.
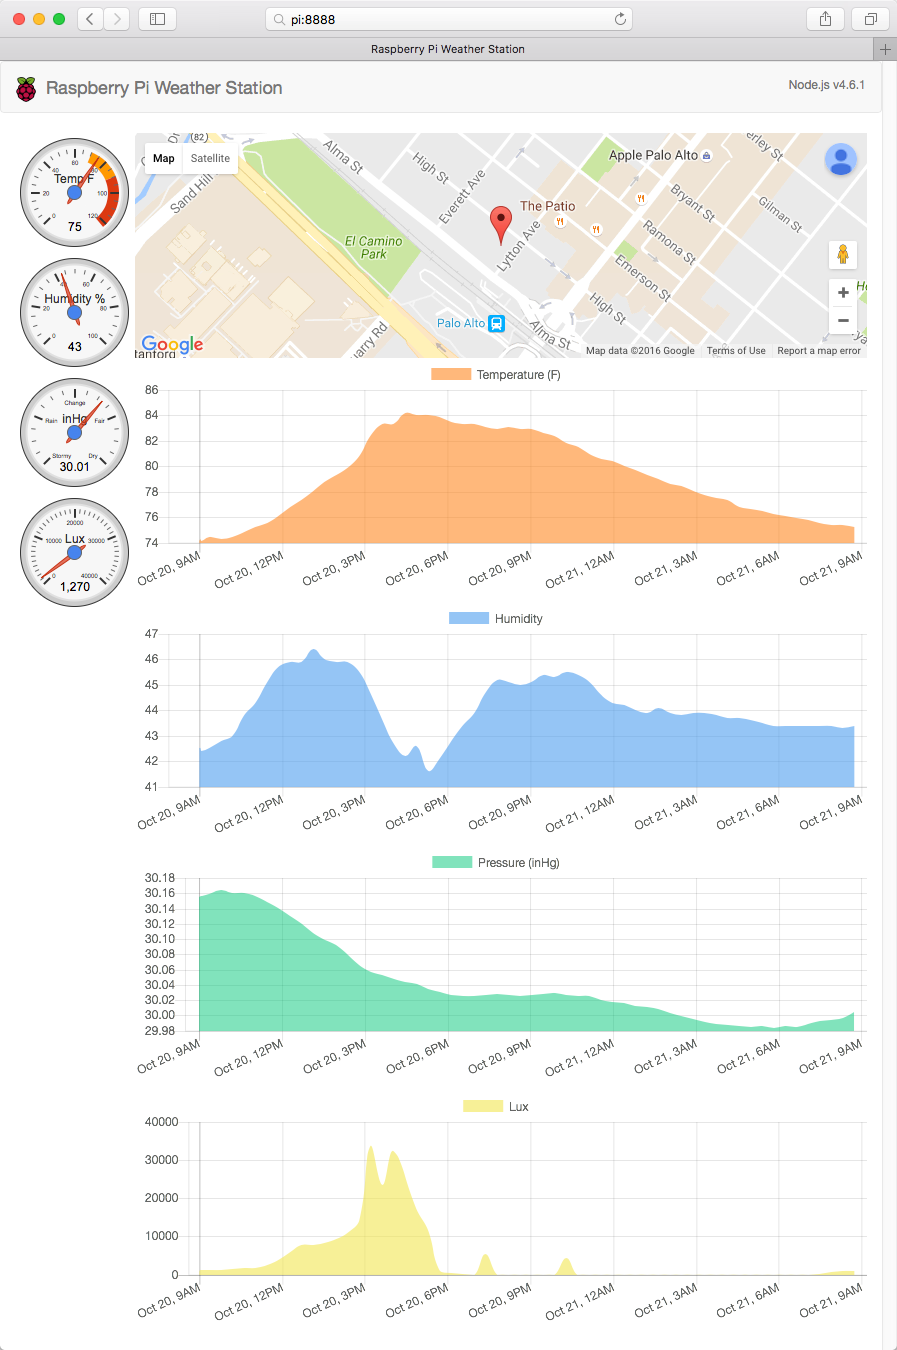
A super basic front-end is served out of the /public directory with a few gauge controls for temperature, humidity, barometric pressure, and lux, as well as a map to display the current location.
Next on the list, maybe a piezo buzzer for a startup sound, an LED for a heartbeat, perhaps an integrated display or LCD. I imagine I'll just keep adding sensors/devices until I run out of room on the prototype board. Also, since the device knows its location, local weather forecasts could be queried from one of several sources.
-
Foremost, I am running this project on a Raspberry Pi 2 Model B. I haven't yet tried this on a RPi 3 since the Adafruit GPS Hat I'm using is not off-the-shelf compatible with that board. It can be made to work I just need to get around to it.
-
BME280 Humidity and Pressure Sensor (I2C). While this device does report temperature, note that temperature is measured by the internal temperature sensor. This temperature value depends on the PCB temperature, sensor element self-heating, and ambient temperature is typically reported above actual ambient temperature.
-
DHT22 Ambient Temperature and Humidity Sensor (Single pin digital signal, not 1-wire)
-
Serial GPS via the Adafruit Ultimated GPS Hat. I am also using a 28dB external antenna but if you have a clear view of the sky the internal patch antenna may do the job.
-
Although I'm targetting the Raspberry Pi, this project will install and run on the desktop (on macOS at least) with simulated values reported for all sensors. For the particulars, see the 'linuxDependencies' section of package.json (not all drivers install and build on all platforms), the install-dependencies.js module used by the 'npm install' step, and /devices/device-manager.js which will instantiate either /devices/device-rpi.js or /devices/devices-simulated.js as appropriate. Running on a local dev machine can make things easier for the front-end development in this project, and even though you could simply mount an SFTP share to your RPi to get your Sublime Text on, hardware independence is a good excercise.
The sensors will fit within the Adafruit GPS Hat prototyping area but for clarity I moved this layout example onto a seperate breadboard. Keep in mind that the CPU on the Raspberry Pi can run quite hot depending on several factors. If you mount an ambient temperature and humidity sensor directly above the main board your measurements may be affected.

Installing Node.js is the first step, but there's a bit more to complete before jumping into 'npm install' and 'npm start'.
At the time of this writing, all is well under Node 4.5.0 and 6.6.0.
This Adafruit Lesson will walk you through I2C configuration on your Pi.
The i2c-bus module requires at least v4.8 to build during install.
sudo apt-get update
sudo apt-get install gcc-4.8 g++-4.8
sudo update-alternatives --install /usr/bin/gcc gcc /usr/bin/gcc-4.6 20
sudo update-alternatives --install /usr/bin/gcc gcc /usr/bin/gcc-4.8 50
sudo update-alternatives --install /usr/bin/gcc gcc /usr/bin/gcc-4.6 20 --slave /usr/bin/g++ g++ /usr/bin/g++-4.6
sudo update-alternatives --install /usr/bin/gcc gcc /usr/bin/gcc-4.8 40 --slave /usr/bin/g++ g++ /usr/bin/g++-4.8

// select 4.8
sudo update-alternatives --config gcc

// confirm you have 4.8.x
g++ -v
gcc -v
The BMC2835 library is required to install and build the dht-sensor module.
cd ~
wget http://www.airspayce.com/mikem/bcm2835/bcm2835-1.5.tar.gz
tar zxvf bcm2835-1.5.tar.gz
cd bcm2835-1.5
./configure
make
sudo make check
sudo make install
This takes several minutes on my RPi 2 Model B. Hang in there.
This Node project needs to talk directly to the hardware and requires access to /open/mem, /sys/class/gpio, and /dev/i2c, so you will typically need run Node with elevated privileges.
sudo npm start
The default port is 8888. Specify your own via the PORT environment variable.