I found this vim package in Here and I modify some of the configurations and Add two registry file to add two entry (open in gvim tab and Open with gvim) in Windows right click context menu.
- After clone the this repo, move this repo directory to where you want to place.
- Add the path to system environment variable[path], if you want to using the ctags and cscope.
- Modify the path string where store the gvim.exe in registry file
EditWithVim-tab.regandEditWithVim.reg. The default isD:\\software\\gVimPortable\\vim73\\gvim.exe\ - Double click the registry files to merge them to system. As the registry file name imply, each of them will add a enty in right click context menu.
- Clone this repo. eg:
mkdir ~/github
cd ~/github
git clone https://github.com/tonyho/VIM.git
- Install the vim(or gvim) using the proper commands, for example in Ubuntu:
sudo apt-get install vim
- Install the cscope, ctags and taglist plugin. eg:
sudo apt-get install ctags cscope
4.Symbol link the .vimrc and .gvimrc. Or make a soft link to it:
cd ~ && ln -s ~/github/VIM/_vimrc ~/.vimrc
cd ~ && ln -s ~/github/VIM/_gvimrc ~/.gvimrc
- Move the vimfiles directory to you home directory, and rename it to .vim,or make a soft link to it:
ln -s ~/github/VIM/vimfiles/ .vim
then clone the vundle:
git clone https://github.com/VundleVim/Vundle.vim.git ~/.vim/bundle/vundle
These is no much different between cygwin and linux to use vim.
Clone this repo. eg:
mkdir ~/github
cd ~/github
git clone https://github.com/tonyho/VIM.git
Install the macvim, for someone using the homebrew, use below commands:
brew install macvim
Install the cscope, ctags:
brew install ctags
brew install cscope
Move the _vimrc file to you home directory, and rename it to .vimrc. Or make ln to it cd ~ && ln -s ~/github/VIM/_vimrc .vimrc
Move the vimfiles directory to you home directory, and rename it to .vim,or ln it ln -s ~/github/VIM/vimfiles/ .vim ;then clone the vundle:
Add the macvim's executive files' path to environment variable PATH by appending the below line to the end of file ~/.bash_profile file: export PATH=$PATH:/usr/local/opt/macvim/bin/
Since we use the vundle to manage the plugins, we should install the plugins. Open a terminal, then open the vim:
vim
In Vim, we just call the PluginInstall to let the vundle install all the needed plugins:
:PluginInstall
After do this, the vundle will auto install the plugins.
If error occurs, use the l to see the logs, or save it the a file. Usually, there're 2 kinds of error:
- Git repo not existed anymore: for this situation, we need to search in github to a new repo, see the _vimrc content for reference.
- Plugin directory already existed in vimfiles/vundle, so just delete it.
Install fonts placed in user_fonts directory, or install all the powerline fonts:
# clone
git clone https://github.com/powerline/fonts.git --depth=1
# install
cd fonts
./install.sh
About the vundle, you can refer this artcle: How To Use Vundle to Manage Vim Plugins on a Linux VPS
If you have golang installled use following:
~/.vim/bundle/YouCompleteMe/install.py --go-completer
Otherwise, install it without golang support:
~/.vim/bundle/YouCompleteMe/install.py
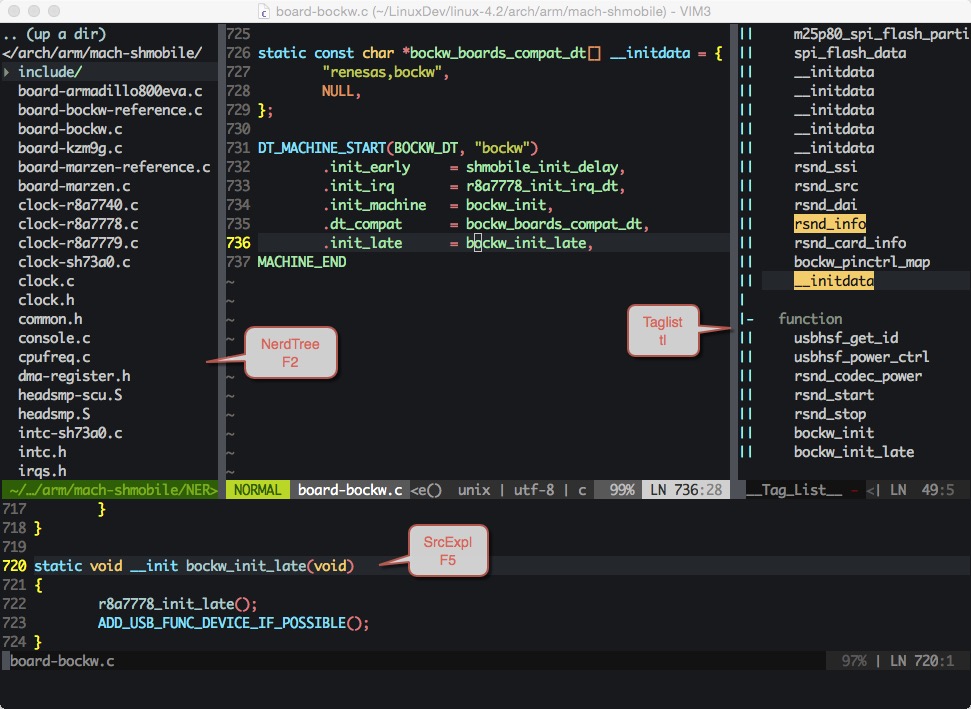
- F5--> Open the source explorer window
- F3--> Previous Definition
- F4--> Next Definition
- F6--> Goto definition
- SPACE --> Back from the Definition
- tl--> taglist, list the tag generated by ctags
- tb--> tagbar, like the taglist
- F2--> Nerd Tree sidebar
- Ctrl+Tab--> Switch to next buffer
- Ctrl+Shift+Tab--> Switch back to previous buffer
- :bnext--> Switch to next buffer
- :bprev--> Switch back to previous buffer
- =--> indent the selected(visual mode) python code
- Ctrl + p--> Ctrlp plugin for search
- cM--> Remove the ^M string at the end of line
- cS--> Remove the space string at the end of line
- :ToggleWhitespace: Display or hide the highlight for the training space
- :StripWhitespace--> Remove the space string at the end of line
See the tabular plugin vimcast
A MacVim screenshot:
Ref config Reference config
PowerLine fonts PowerLine Fonts
Markdown CheatSheet Markdown cheatsheet
- Change the PowerLine to airline with buffer file list at status bar
- Add Gvim rc
- Change fonts to RobotoMono
- Replace Syntastic with YouCompelteMe
- Add python relatives
- Using PaperColor color theme for Gvim/VIM, for this theme support many other plugins
- Add golang plugin: 'fatih/vim-go'
- Add ctrlp plugin