z. Check In System
The Rock check-in system is a set of Blocks that operates in cooperation with a non-persisted Workflow. These blocks activate well-known Workflow "Activities" that manipulate the CheckInState object (stored in session). The blocks then use the CheckInState object to control the flow of which block is displayed next.

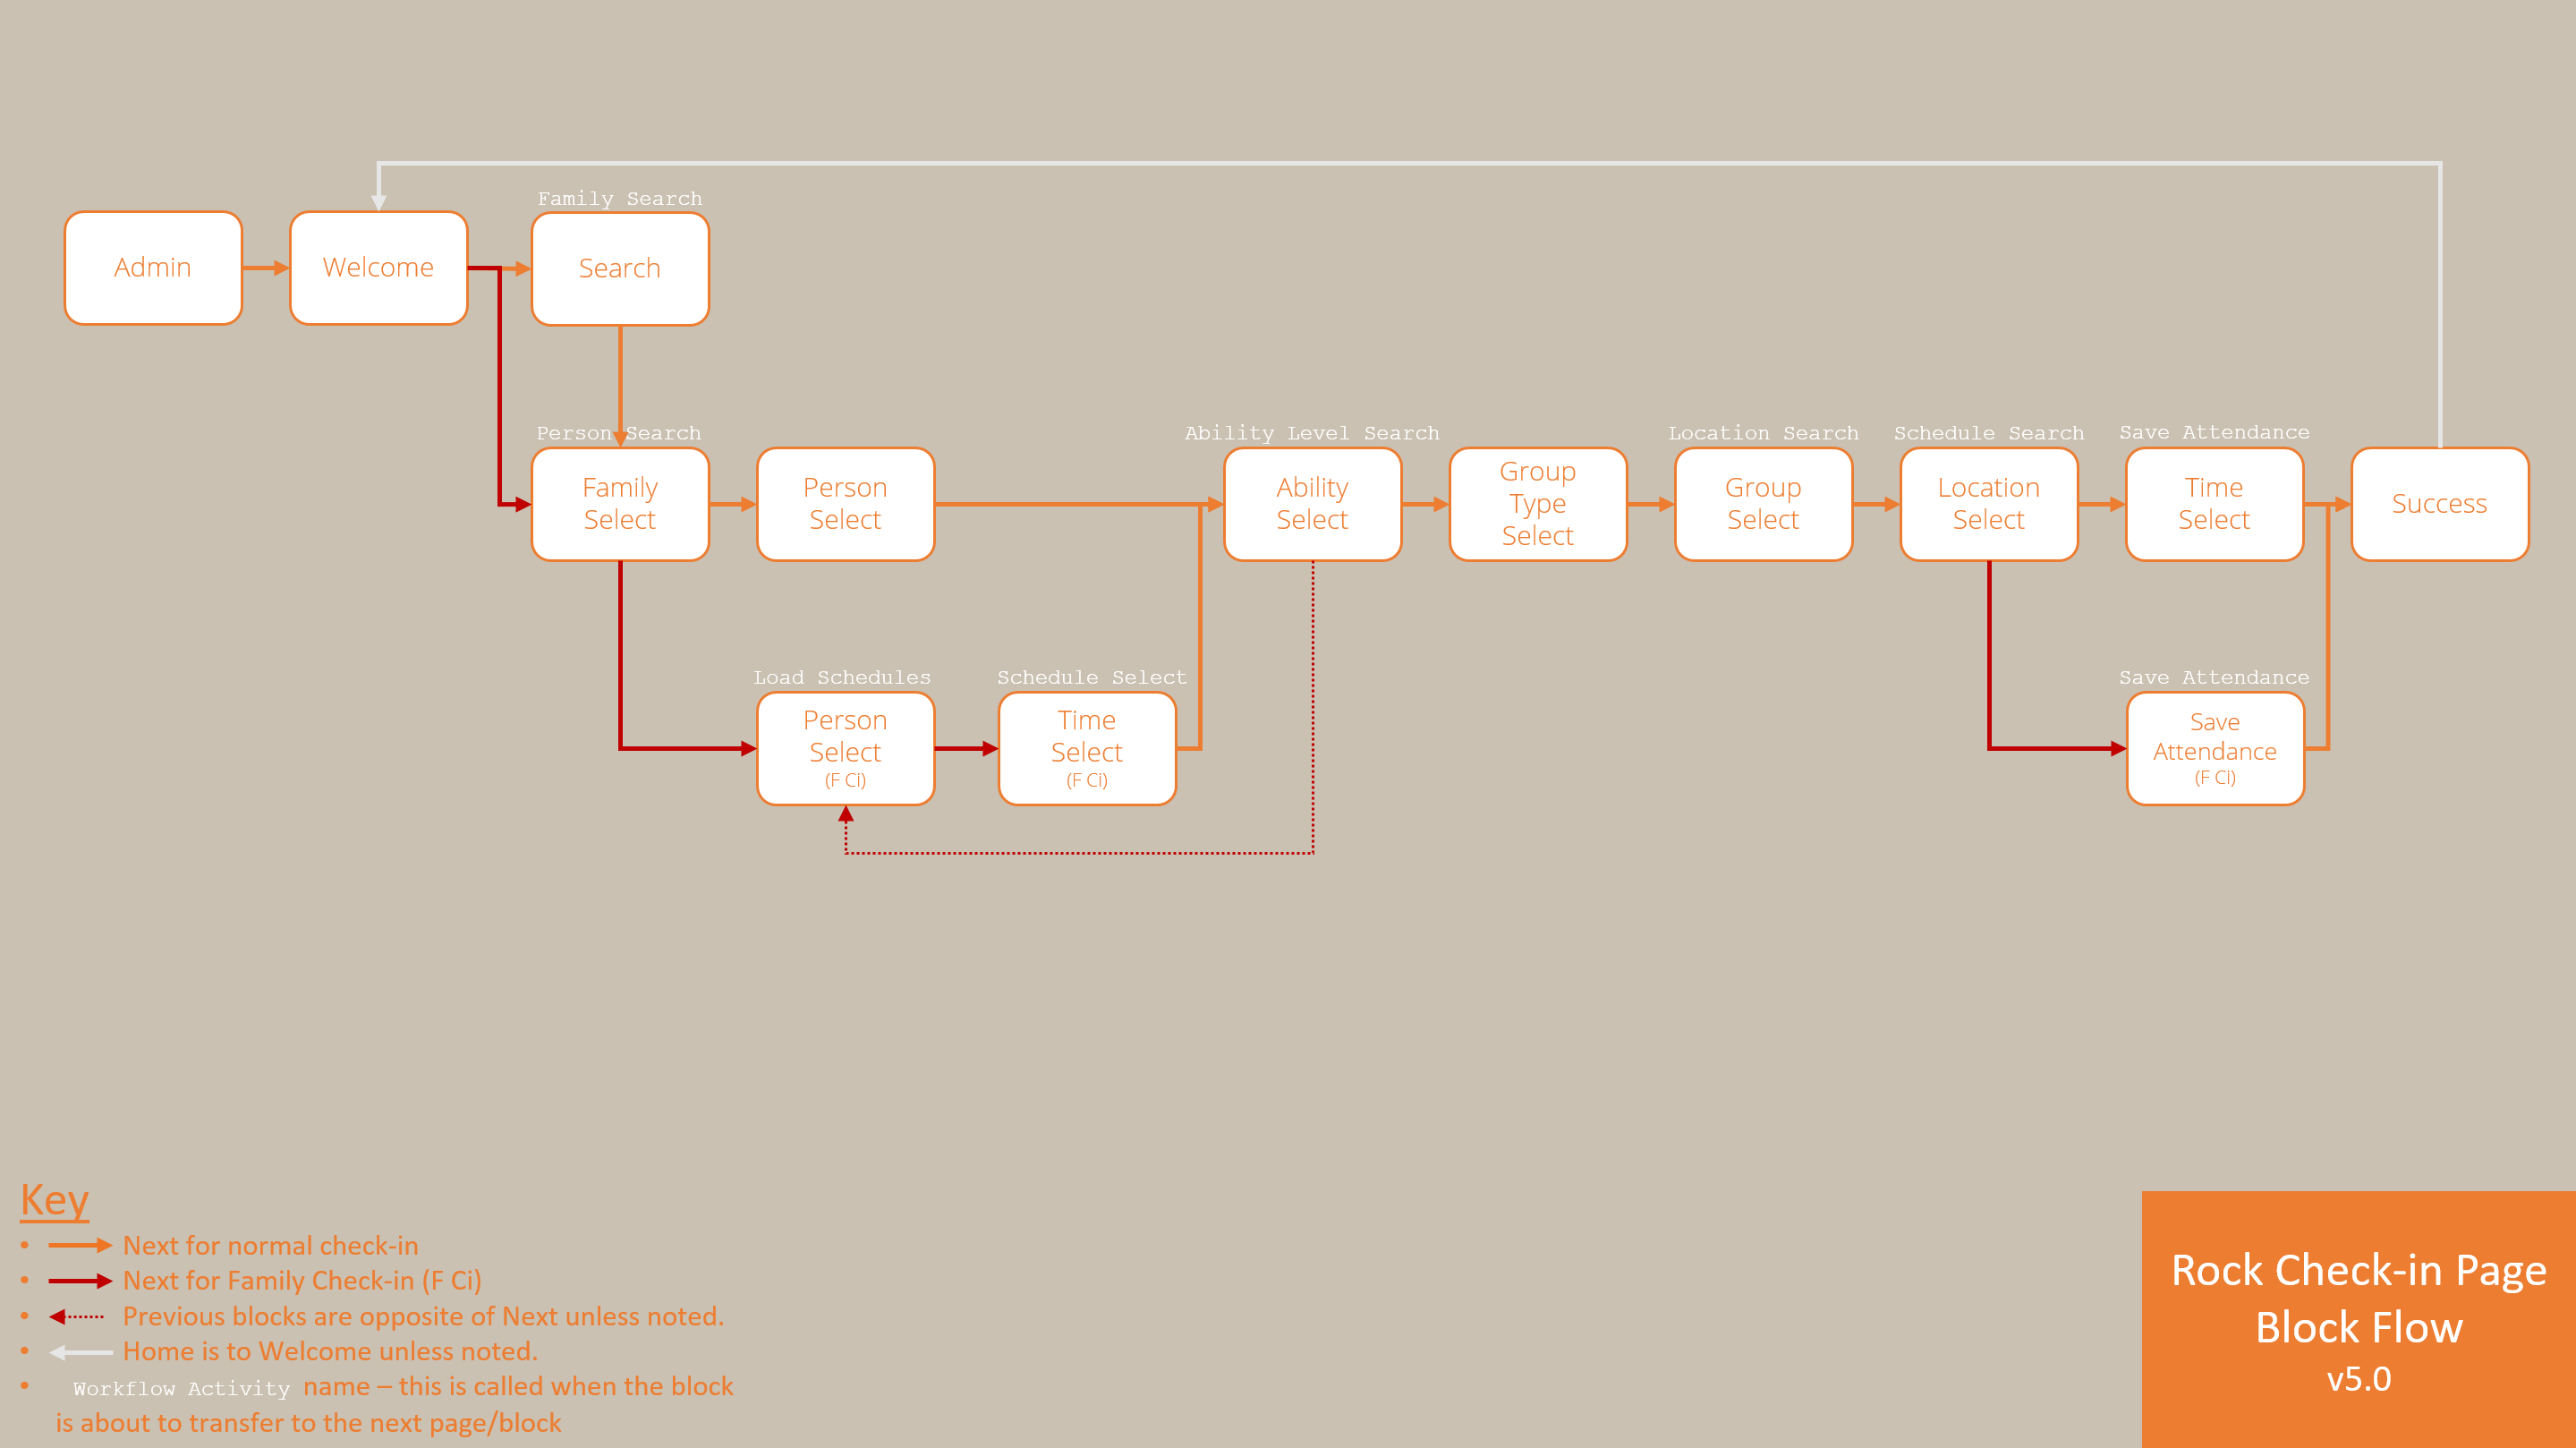
From a high level the Rock McKinley v5 page-block flow for a successful check-in would be as follows.
WARNING! The information below is for Rock v4 and earlier. Rock v5 introduced the concept of Family Check-in and many new classes, properties and blocks were introduced that are not document here.
From another perspective the Rock McKinley v4 flow for check-in would be as follows (as visualized by http://www.websequencediagrams.com/)
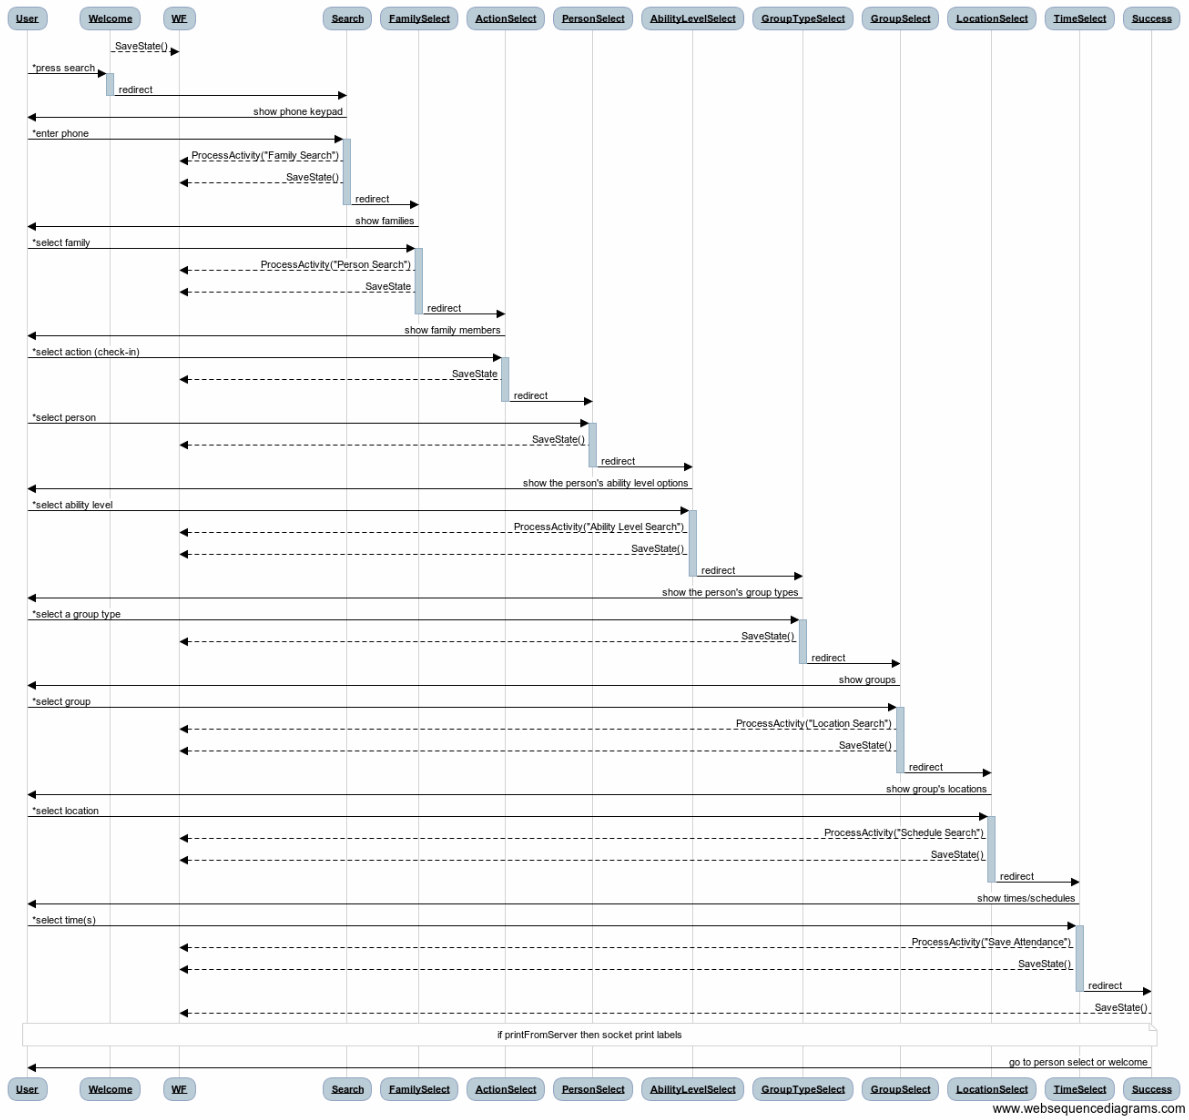
Editor Note: Do NOT delete this sequence diagram markup below because I'm still hopeful that Github's Gollumn will begin supporting them again. In the mean time I'm manually using the tool at www.websequencediagrams.com to generate an image for the markup.
{{{{{{ vs2010
    participant User
    Welcome-->WF: SaveState()
    User->+Welcome: *press search
    Welcome->-Search: redirect
    Search->User: show phone keypad

    User->+Search: *enter phone
    Search-->WF: ProcessActivity("Family Search")
    Search-->WF: SaveState()
    Search->-FamilySelect: redirect

    FamilySelect->User: show families

    User->+FamilySelect: *select family
    FamilySelect-->WF: ProcessActivity("Person Search")
    FamilySelect-->WF: SaveState
    FamilySelect->-ActionSelect: redirect

    ActionSelect->User: show family members

    User->+ActionSelect: *select action (check-in)
    ActionSelect-->WF: SaveState
    ActionSelect->-PersonSelect: redirect

    User->+PersonSelect: *select person
    PersonSelect-->WF: SaveState()
    PersonSelect->-AbilityLevelSelect: redirect

    AbilityLevelSelect->User: show the person's ability level options

    User->+AbilityLevelSelect: *select ability level
    AbilityLevelSelect-->WF: ProcessActivity("Ability Level Search")
    AbilityLevelSelect-->WF: SaveState()
    AbilityLevelSelect->-GroupTypeSelect: redirect

    GroupTypeSelect->User: show the person's group types

    User->+GroupTypeSelect: *select a group type
    GroupTypeSelect-->WF: SaveState()
    GroupTypeSelect->-GroupSelect: redirect

    GroupSelect->User: show groups

    User->+GroupSelect: *select group
    GroupSelect-->WF: ProcessActivity("Location Search")
    GroupSelect-->WF: SaveState()
    GroupSelect->-LocationSelect: redirect

    LocationSelect->User: show group's locations

    User->+LocationSelect: *select location
    LocationSelect-->WF: ProcessActivity("Schedule Search")
    LocationSelect-->WF: SaveState()
    LocationSelect->-TimeSelect: redirect

    TimeSelect->User: show times/schedules

    User->+TimeSelect: *select time(s)
    TimeSelect-->WF: ProcessActivity("Save Attendance")
    TimeSelect-->WF: SaveState()
    TimeSelect->-Success: redirect

    Success-->WF: SaveState()
      note over Success, User
      if printFromServer then socket print labels
      end note

    Success->User: go to person select or welcome
}}}}}}
Currently there are eleven (11) standard Check-in Blocks (which inherit from CheckInBlock) that work together to create the check-in flow. They are logically ordered:
- Admin - let's the admin choose an existing kiosk configuration and set of group types for which the kiosk will take attendance/check-in.
- Welcome - displays a start/welcome screen with button for performing phone search
- Search - a phone search screen
- FamilySelect - lists all families found during the search
- PersonSelect - lists all people (family members & related for check-in) that can be checked-in
- AbilityLevelSelect - lists possible ability levels to choose for selected person.
- GroupTypeSelect - lists all group types for the selected person
- GroupSelect - lists all groups for the selected person and group type.
- LocationSelect - lists all locations for the selected group.
- TimeSelect - lists all applicable times for which the person can be checked in.
- Success - a success screen and handles printing any needed labels; returns to Welcome page-block.
As seen in the diagram above, these six (6) standard check-in workflow Activities are invoked (by name) by the check-in blocks. The Activities are:
- Family Search
- Person Search
- Ability Level Search
- Location Search
- Schedule Search
- Save Attendance
- Load Schedules
- Schedule Select
- Create Check-Out Labels
Each Activity is comprised of a list of Actions -- and those actions are automatically fired when an Activity is invoked.
An organization can modify the Actions for any of those known check-in Activities to change the behavior of the check-in system logic without changing or breaking the standard flow. New actions can be developed or installed as needed using Rock's Plugin system.
Actions:
- Find Families - finds families that have the phone number matching what was searched.
Actions:
- Find Family Members - family members are added to the
Peoplecollection of the selected family in thecheckInState.CheckIn.Familieslist - Find Relationships - adds people for whom family members have the 'CanCheckin' attribute
- Load Group Types - for each GroupType that the
checkInState.Kioskperforms check-in for, this action adds that GroupType to each person's list of GroupTypes - Filter GroupTypes by Age - removes the GroupTypes from each family member that are not specific to their age
- Filter GroupTypes by Grade -
- Load Groups -
- Filter Groups by Age -
- Filter Groups by Grade -
- Load Locations -
- Filter Locations by Threshold -
- Remove Empty Groups -
- Remove Empty Group Types
- Remove Empty People - remove any person who does not have a GroupType associated with them
- Load Schedules -
- Update Last Attended - sets the
LastCheckInvalue for each person
Actions:
- Filter Groups by Ability Level (person may have changed their ability level prior to this)
- Filter Active Locations -
- Remove Empty Groups -
- Remove Empty Group Types -
- Set Available Schedules -
Actions:
- Load Locations
- Filter Active Locations
- Remove Empty Groups
- Update Last Attended
Actions:
- Load Schedules
Actions:
- Save Attendance
- Create Labels
Actions:
- Load Schedules
Filters the locations, groups, and group types by the selected schedule(s) in Family Check-In
Actions:
- Filter Locations By Schedule
- Remove Empty Locations
- Remove Empty Groups
- Remove Empty Group Types
- Set Available Schedules
- Remove Previous Checkins
Creates the labels to be printed during check-out
Actions:
- Create Labels
To get a better idea of how Actions inter-operate with the CheckInState object, let's examine the Execute method for the single "Find Families" Action of "Family Search" Activity. Details on creating a custom Action are described below, so without getting into too much detail on what else is going on, you'll see on line 10 the phone number that was entered by a user (checkInState.CheckIn.SearchValue) is being used to find matching families.
1:  var checkInState = GetCheckInState( action, out errorMessages );
2:  if (checkInState != null)
3:  {
4:    if ( checkInState.CheckIn.SearchType.Guid.Equals( new Guid( SystemGuid.DefinedValue.CHECKIN_SEARCH_TYPE_PHONE_NUMBER ) ) )
5:    {
6:      using ( new Rock.Data.UnitOfWorkScope() )
7:      {
8:        var personService = new PersonService();
9:        var memberService = new GroupMemberService();
10:        foreach ( var person in personService.GetByPhonePartial( checkInState.CheckIn.SearchValue ) )
11:        {
12:          foreach ( var group in person.Members.Where( m => m.Group.GroupType.Guid == new Guid( SystemGuid.GroupType.GROUPTYPE_FAMILY ) ).Select( m => m.Group ) )
13:          {
14:            var family = checkInState.CheckIn.Families.Where( f => f.Group.Id == group.Id ).FirstOrDefault();
In lines 17-21, a new family is set up and then on line 22 it's added to the CheckInState's Families collection (checkInState.CheckIn.Families).
15:            if ( family == null )
16:            {
17:              family = new CheckInFamily();
18:              family.Group = group.Clone( false );
19:              family.Group.LoadAttributes();
20:              family.Caption = group.ToString();
21:              family.SubCaption = memberService.GetFirstNames( group.Id ).ToList().AsDelimited( ", " );
22:              checkInState.CheckIn.Families.Add( family );
23:            }
24:          }
25:        }
26:      }
27:      if ( checkInState.CheckIn.Families.Count > 0 )
28:      {
29:        SetCheckInState( action, checkInState );
30:        return true;
31:      }
32:      else
33:      {
34:        errorMessages.Add( "There are not any families with the selected phone number" );
35:      }
36:    }
37:    else
38:    {
39:      errorMessages.Add( "Invalid Search Type" );
40:    }
41:  }
42:  return false;
Lastly, on line 29, the updated checkInState is set into the current session's check-in state and the Execute method returns true.
This is the kind of thing that the CheckInState object is used for during a check-in session.
Similar to what's described in the Custom Workflow Actions section, custom check-in workflow Actions need to inherit from the CheckInActionComponent class and implement the required Execute() method to function properly with the check-in system. This will give the Action access to the CheckInState instance which represents the state of a person checking in. Inside the Execute() method of a custom check-in action you'd probably want to do something like this:
        var checkInState = GetCheckInState( action, out errorMessages );
        if ( checkInState != null )
        {
            // Do something relevant
            // <your code here>

            SetCheckInState( action, checkInState );
            return true;
        }
        return false;
For example, if we look at the code for the RemoveEmptyPeople action, we will see the people in each families in the CheckInState who have no GroupTypes are removed from the family for that particular check-in attempt. This is done so their names do not unnecessarily clutter the screen (since they cannot be checked into anything anyhow).
    public override bool Execute( Model.WorkflowAction action, Data.IEntity entity,
        out List<string> errorMessages )
    {
        var checkInState = GetCheckInState( action, out errorMessages );
        if ( checkInState != null )
        {
            foreach ( var family in checkInState.CheckIn.Families.ToList() )
            {
                foreach ( var person in family.People.ToList() )
                {
                    if ( person.GroupTypes.Count == 0 )
                    {
                        family.People.Remove( person );
                    }
                }
            }

            SetCheckInState( action, checkInState );
            return true;
        }

        return false;
}This class is pretty important to understand so let's examine the properties of this class a layer at a time.

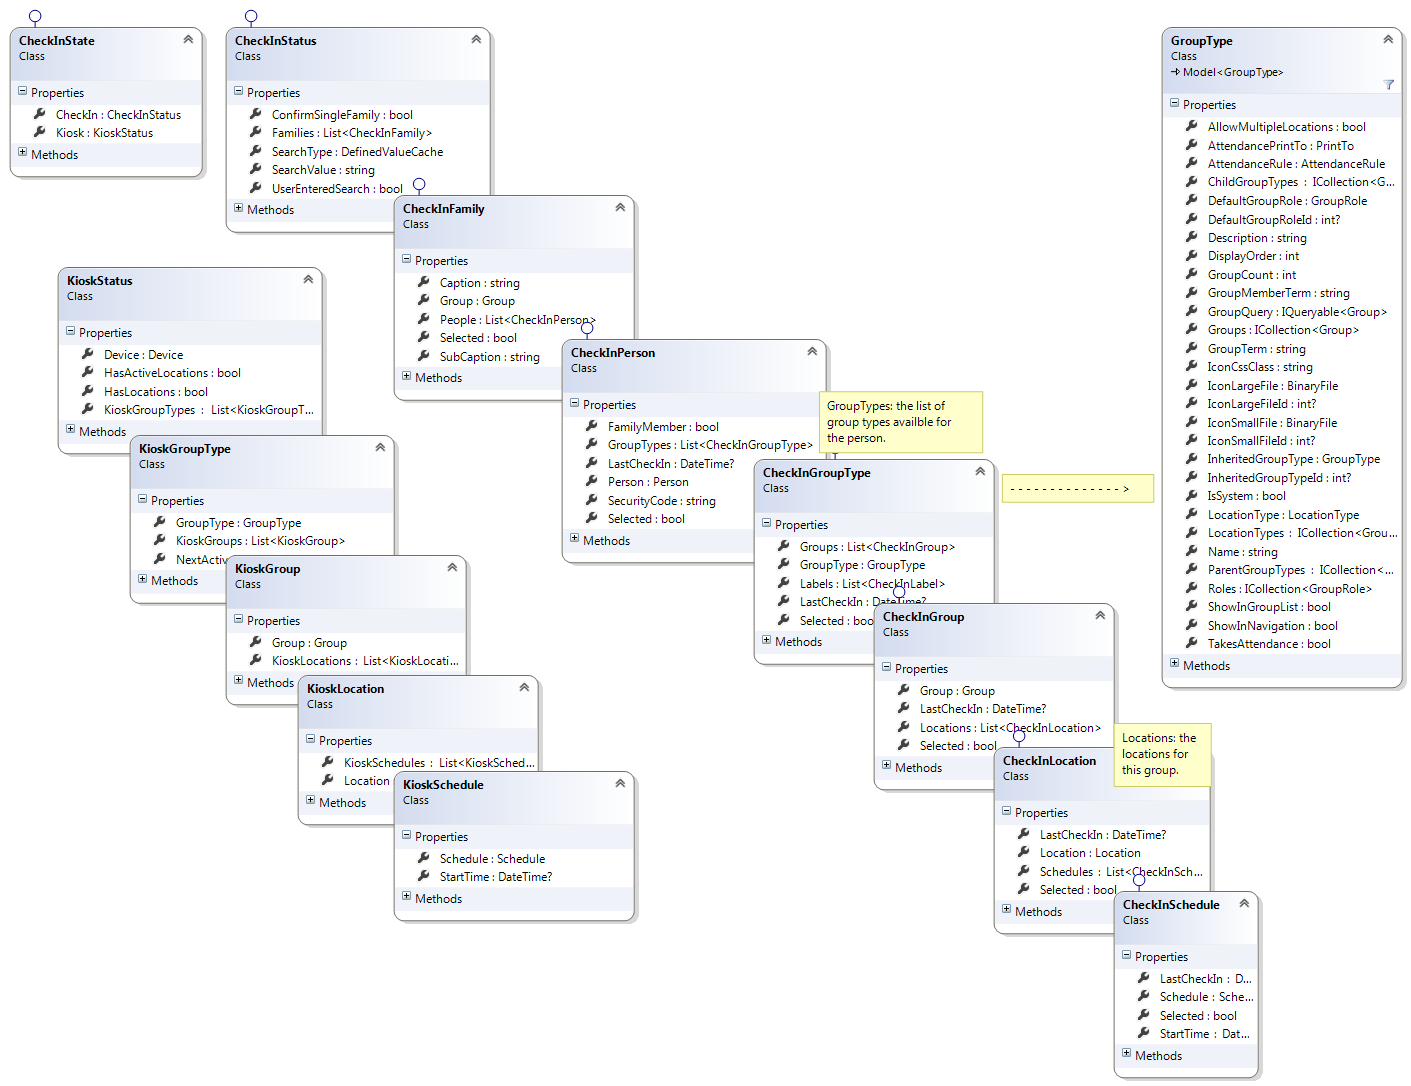
-
CheckIn - (CheckInStatus) object which has the
SearchTypethat was performed, theSearchValue, and the list ofFamilies. -
Kiosk - (KioskStatus) object which has the
Deviceof the kiosk, a list ofKioskGroupTypesTheCheckInStatehas aKioskproperty.
Let's look at this next layer a little closer...

- ConfirmSingleFamily - (bool) indicates whether or not the search that results in a single family match should be confirmed before proceeding to the next step.
- Families - (List) this is a list of families that matched the family search.
-
SearchType - (
DefinedValue) the kind of search being performed (such as "Phone Number", "Barcode", etc.). - SearchValue - (string) the search value (a particular phone number, a barcode id, etc.)
- UserEnteredSearch - (bool) indicates whether or not a person entered the search value; false if it was via a scan of some sort.
- Device - the Rock Device model class
- HasActiveLocations - (bool) a flag that indicates whether or not there are any active (open) locations associated with the kiosk. If false, it means the event is essentially 'closed'.
- HasLocations - (bool) a flag that indicates whether or not there are any locations associated with the kiosk.
- KioskGroupTypes - (List) this is a list of classes (GroupTypes) associated with the kiosk.
Here's a diagram depicting all the significant layers and properties of the CheckInState for your reference. You can also find this class diagram in the Rock solution (called CheckInStateClassDiagram).
So what if you want to change the flow of the check-in process? For this you will need to...
- Be sure to run the play-data scripts mentioned on the Installing Rock - Play Data page. Namely the
Populate_Three_Families.sqlscript. - TODO
TODO: Complete this section with additional guidance.
With an auto (best match) centralized check-in system, you'll need to configure the workflow actions slightly differently.
-
Family Search - Actions:
- Find Families
-
Person Search - Actions:
- Find Family Members
- Find Relationships
- Load Group Types
- Filter by Age (Group Types)
- Filter by Grade (Group Types)
- Remove Empty People
- Update Last Attended
-
Group Search - Actions:
- Load Groups
- Update Last Attended
-
Location Search - Actions:
- Filter Groups by AbilityLevel (person may have changed their ability level prior to this)
- Load Locations
- Filter Active Locations
- Update Last Attended
- Filter Location Groups by Special Needs
- Filter Location Groups by LastName
- Remove Empty Locations
-
Schedule Search - Actions:
- Load Schedules
-
Save Attendance - Actions:
- Save Attendance
- Create Labels
To understand how the check-in system labels and name-tags work, read the chapter on Creating Zebra Check in Labels.